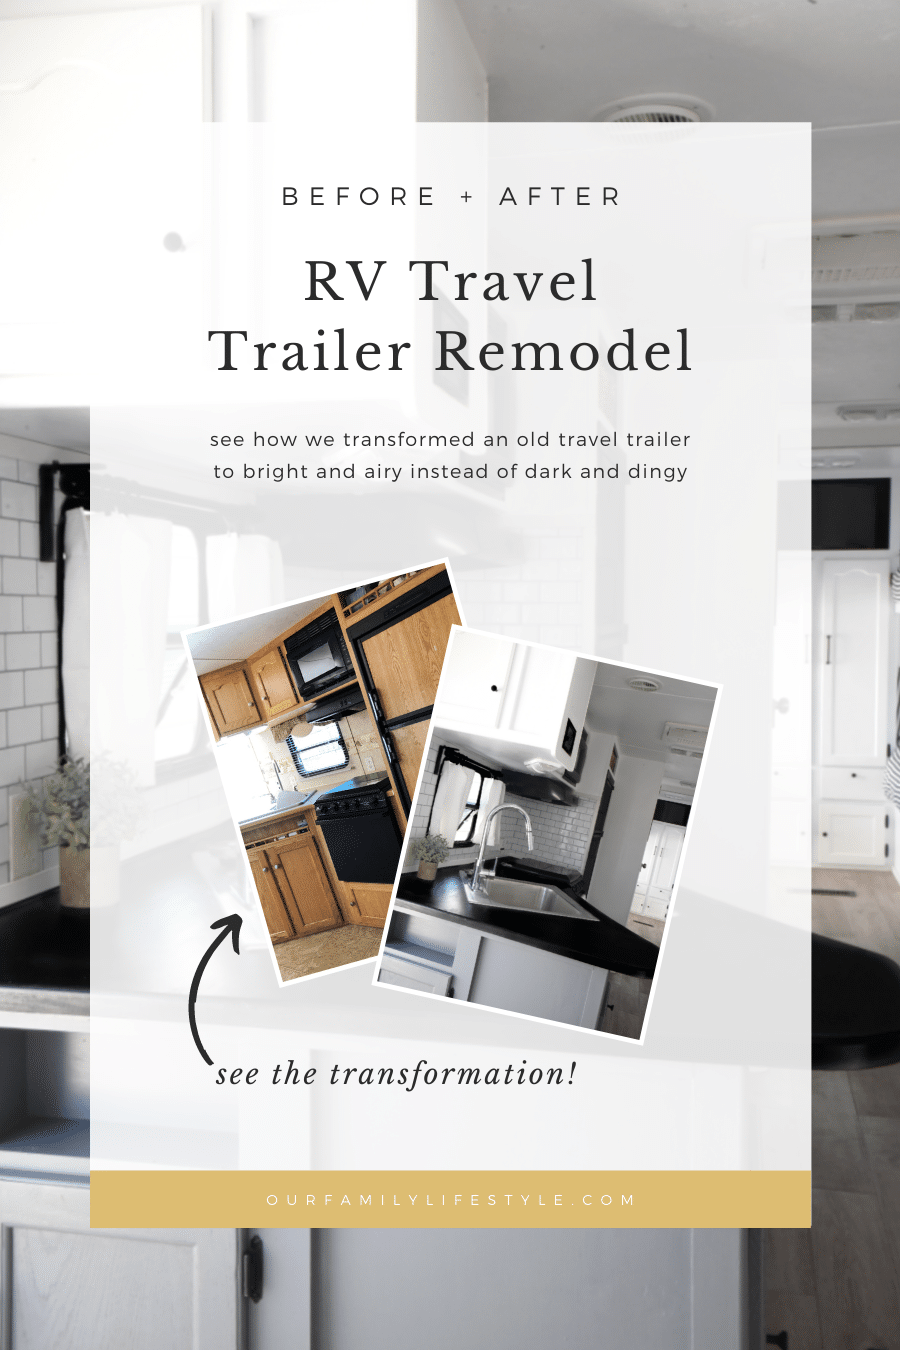
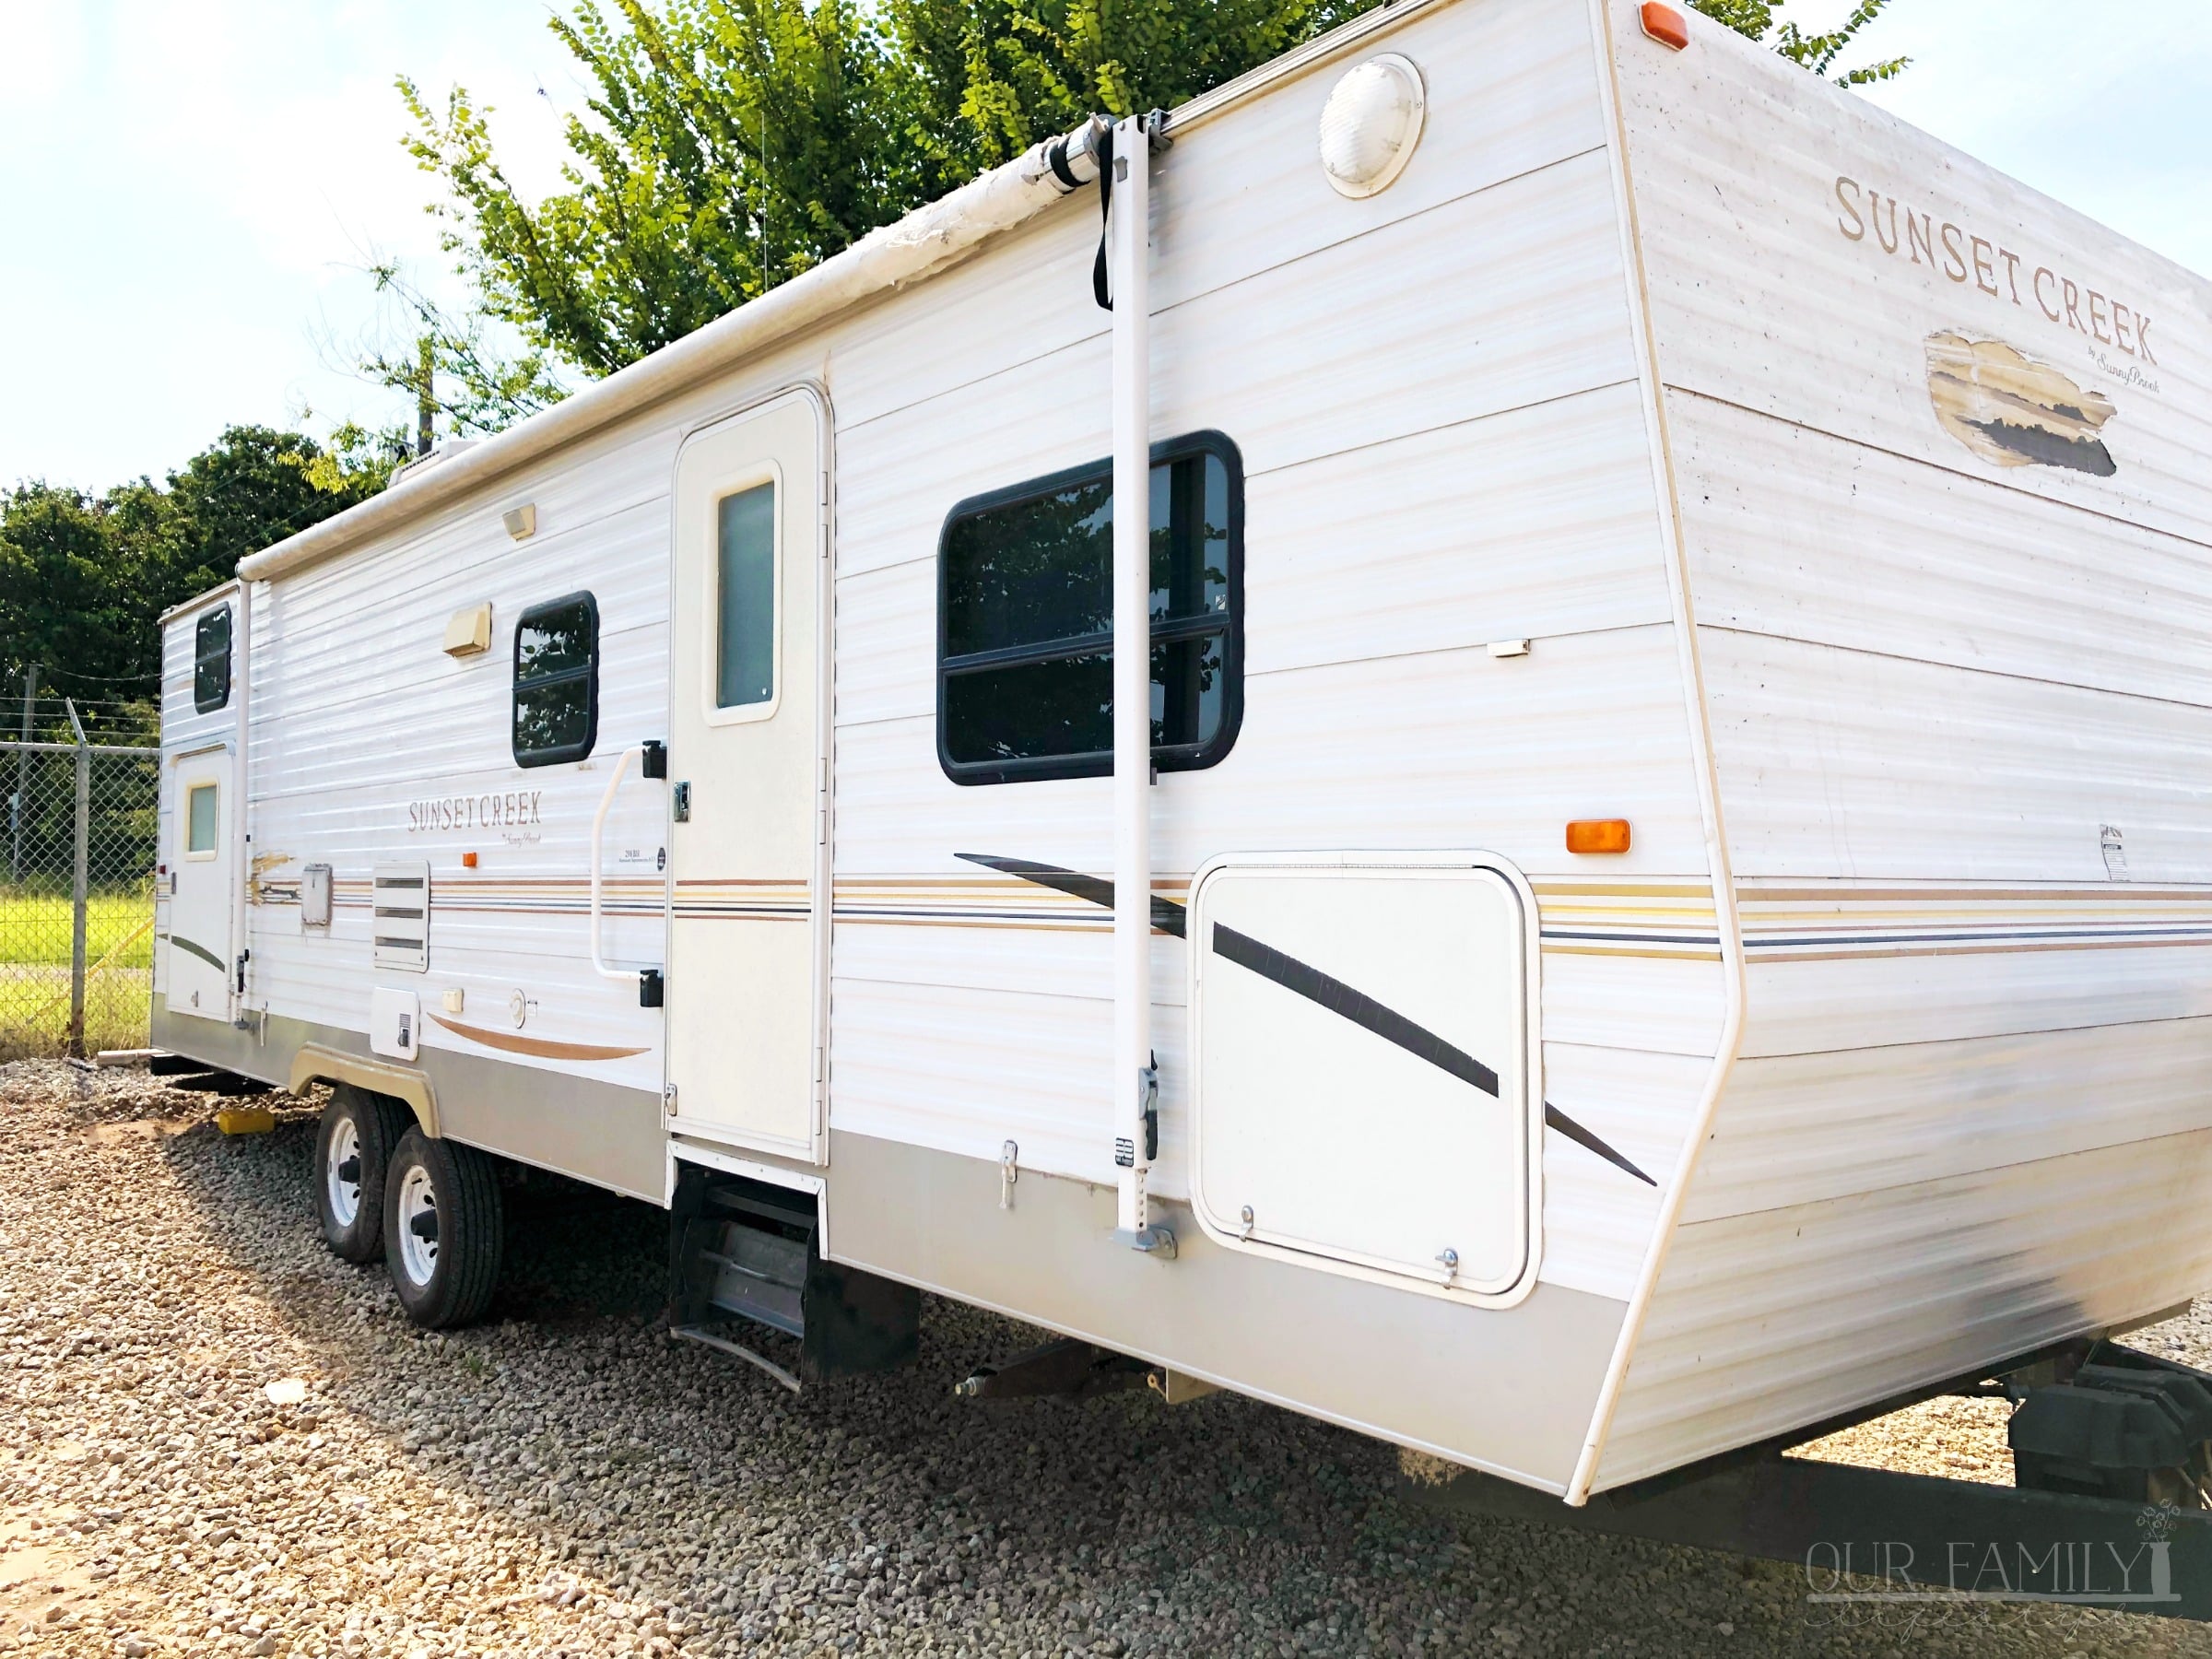
When we decided we wanted to buy a travel trailer, we knew it wouldn’t be a new one. One, we couldn’t afford it. Two, we didn’t want it.
Colby and I love a good DIY project. Before building our house, we seriously considered buying an old house we could fix up.
Yep, Fixer Upper is one of my favorite shows. Channeling our inner Chip and JoJo was exactly what we had in mind.
But, we decided to go a different direction.
Therefore, when we were looking for an RV trailer, we weren’t concerned with what it looked like cosmetically. We really just needed to make sure it was fine structurally.
Hence the reason we bought the trailer we did. It was structurally sound and needed a bit of TLC.
We wanted to provide the TLC and put our own twist on her. To make her fit our style and our needs.
Therefore, we snagged this one and got to work on her.
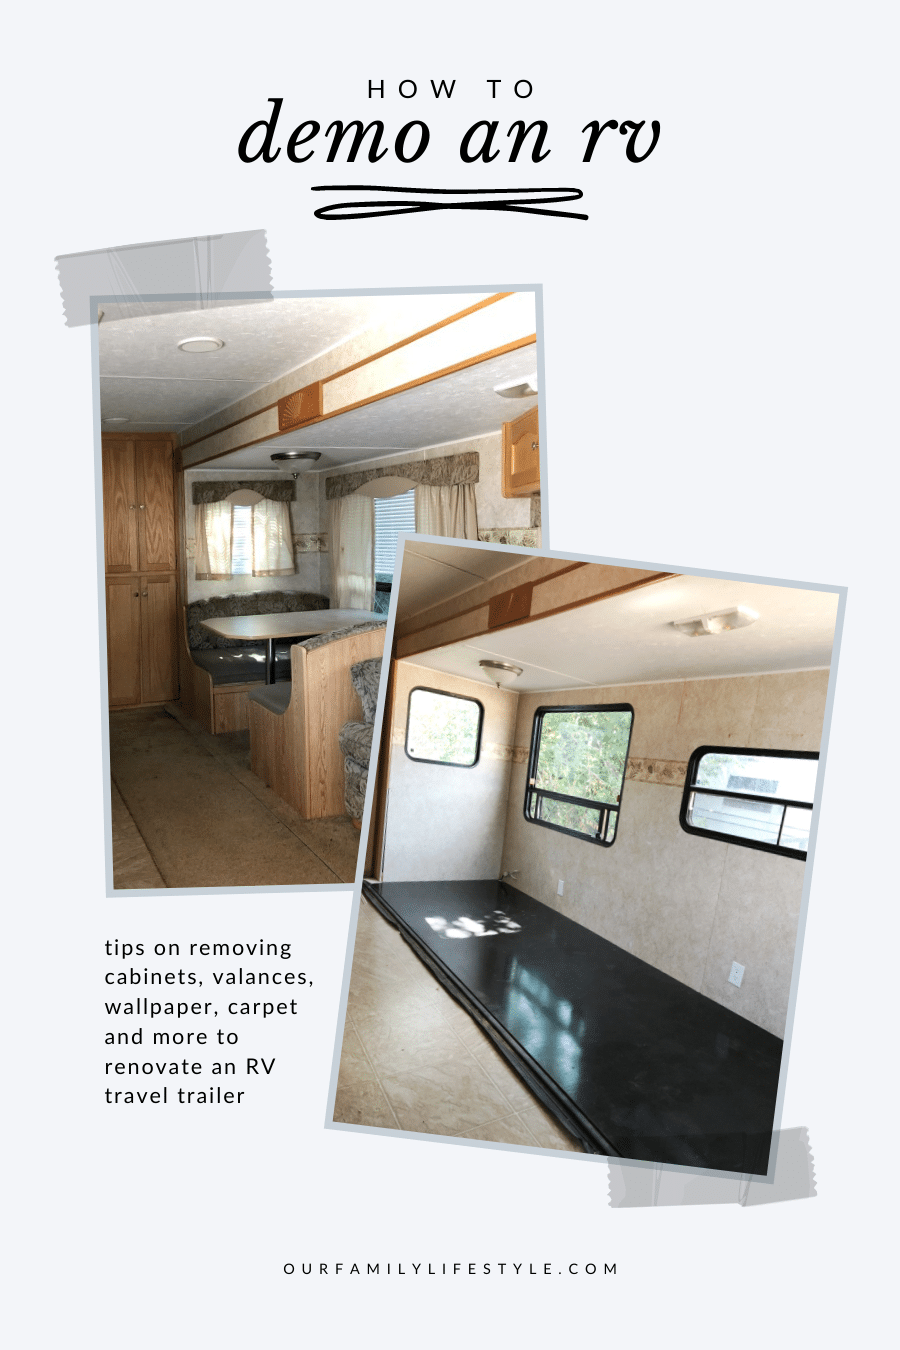
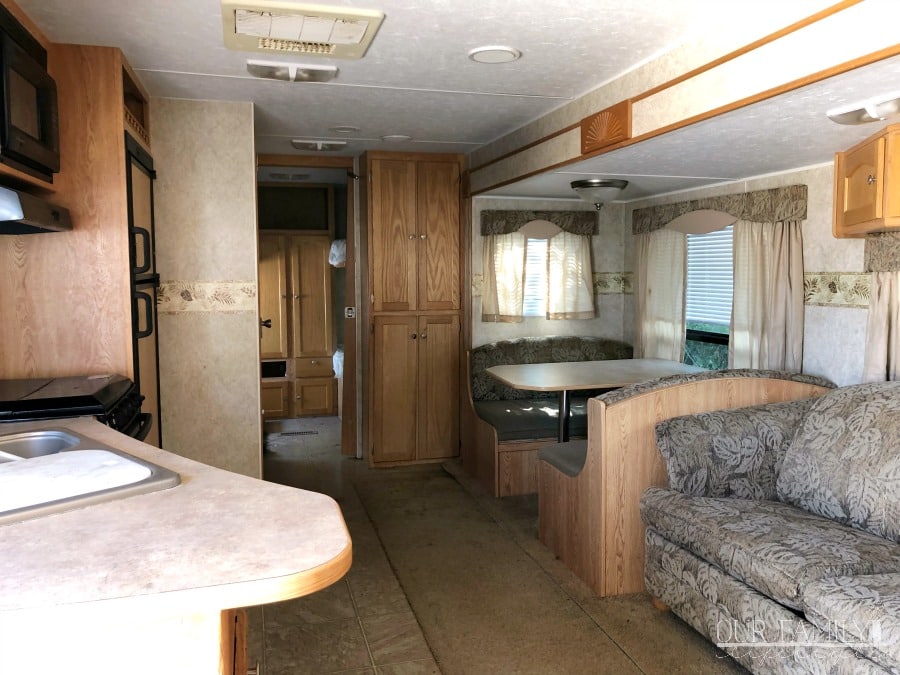
We began by gutting the slide out. The chunky sleeper sofa was dirty and just not doing anything for me.
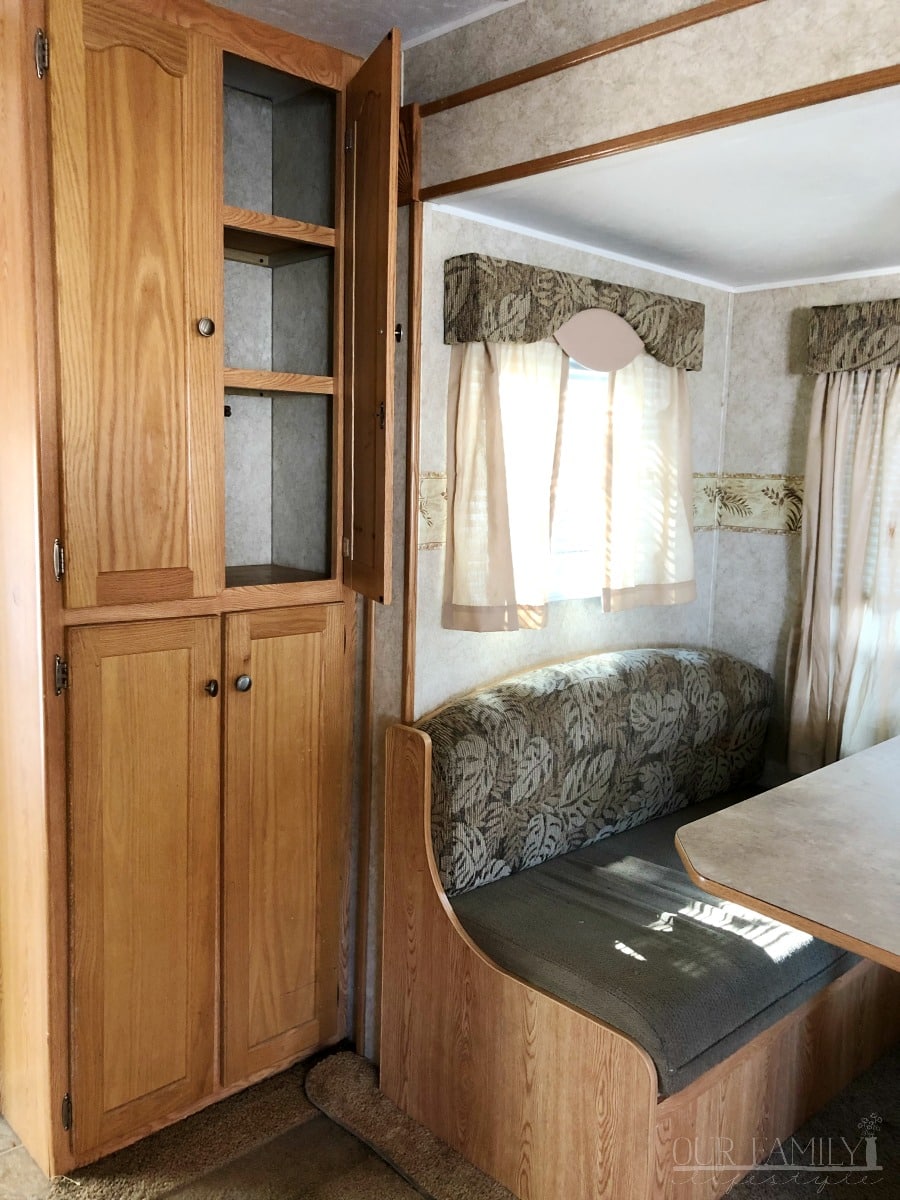
The dinette was taking up too much unnecessary space, outdated, and ugly. I can’t think of a better way to explain it.
Not to mention, the carpet was incredibly dirty and well-worn. It had to go as well. In fact, eventually, we replaced all of the plywood floorings with vinyl planks.
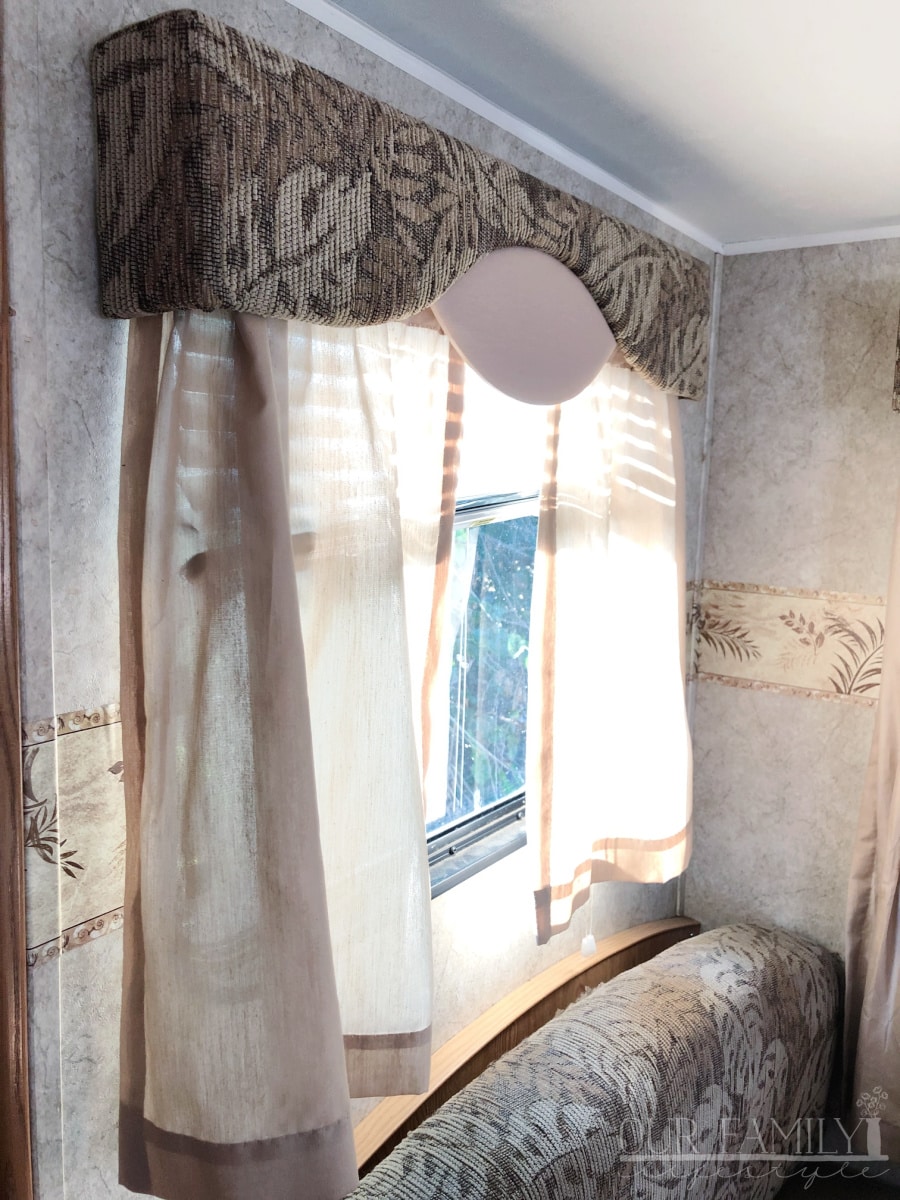
And let’s not talk about those old school valances. Just. No. They had to go too.
All of them.
My dad thought I was crazy for taking them all out. Nope.
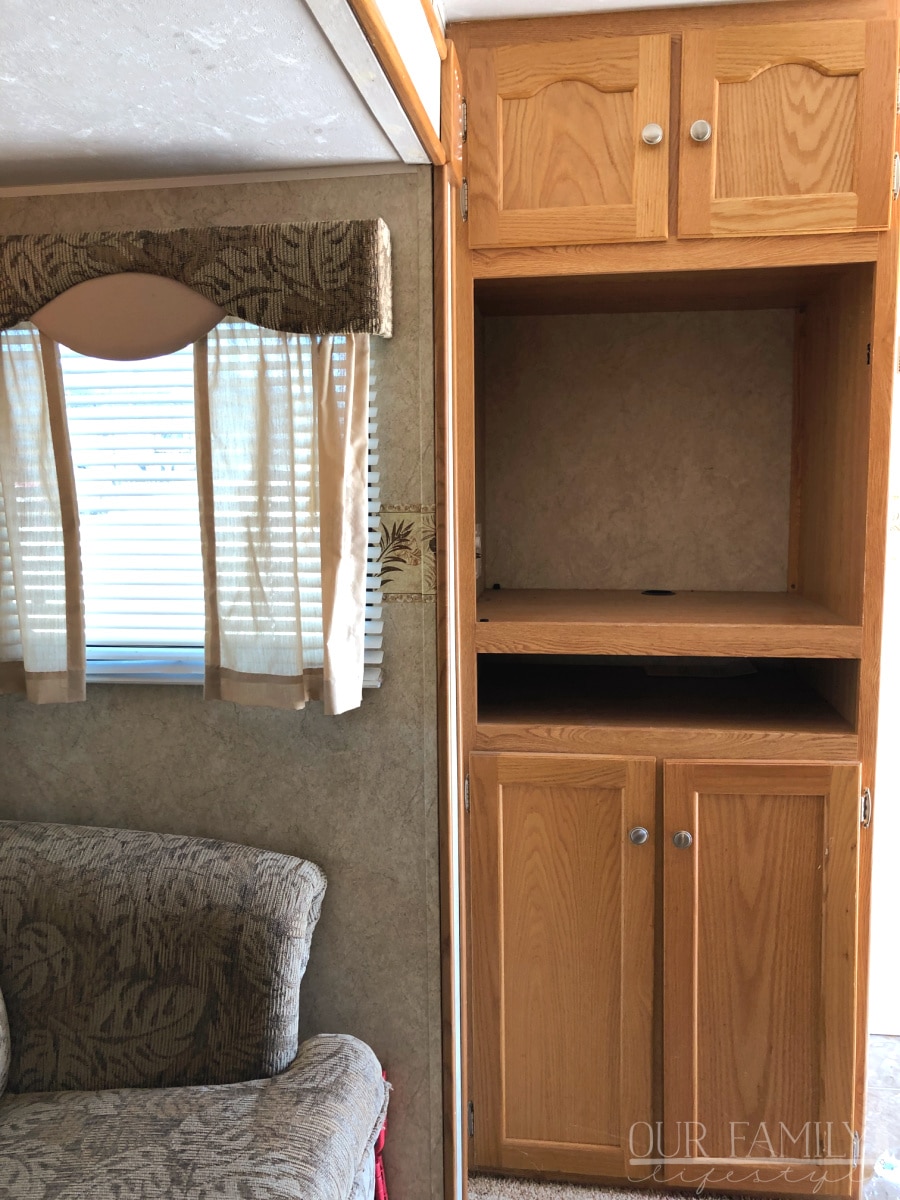
The entertainment center also had to come out. I’m not one for watching TV while camping; so it was using up precious space. I had other plans for that area.
Next, we got started on the walls.
We removed the wallpaper border, removed any glue left behind with Goo Gone, then cleaned and sanded the walls.
As we cleaned and demoed, we took notes of any damage and measured everything from the windows to the kitchen counter to the floor area.
Then the real work began.
I felt like we would never be done with all the painting.
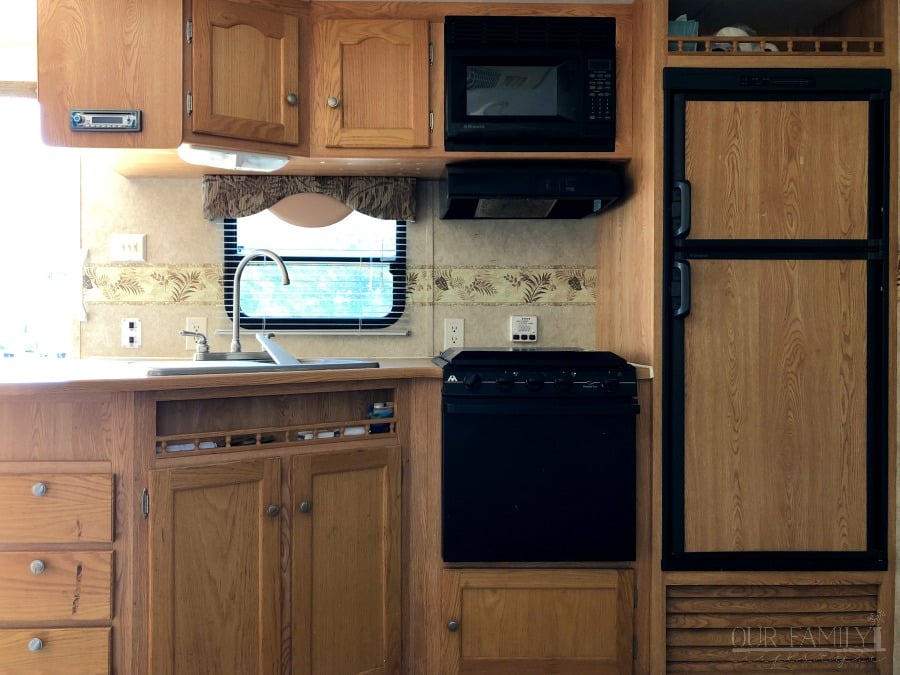
I hated every bit of the brown wood veneer. The cabinets, fridge, beds; it was everywhere.
If not the fake wood, then it was the dingy, worn-out wallpaper. Everything had to be sanded down and painted over.
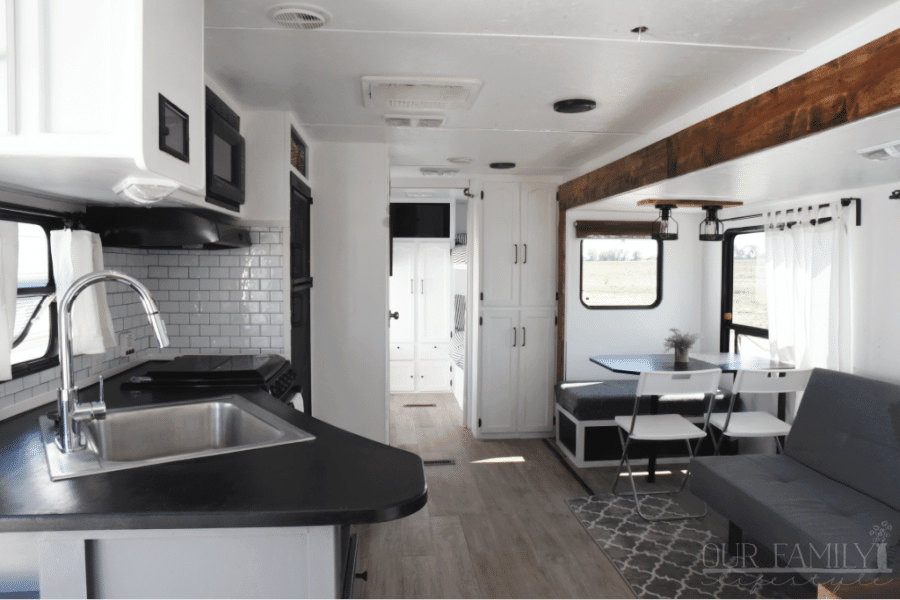
Simply by painting all the walls white, the space inside the trailer felt double what it was before. (We used this paint and primer in one).
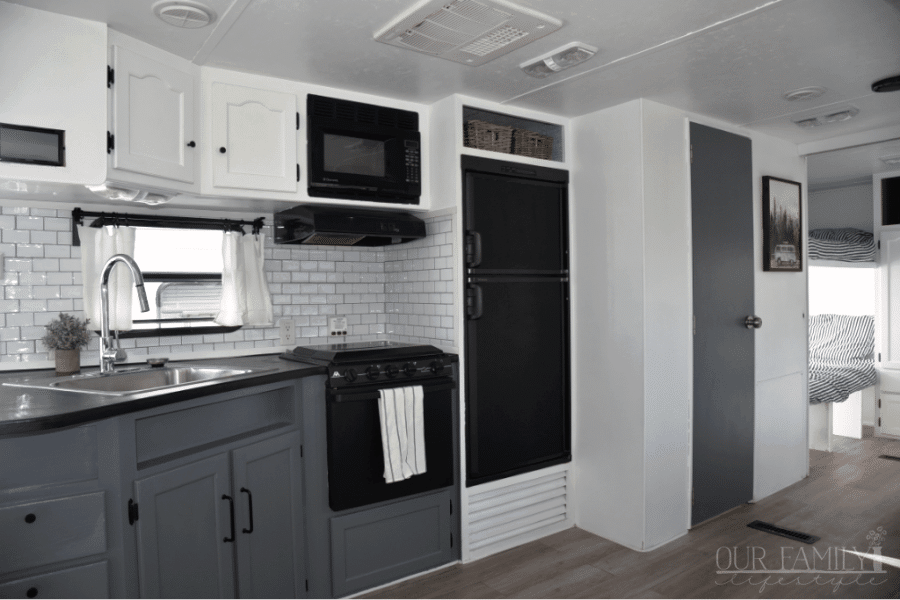
I decided on a dark grey for the bottom kitchen cabinets to hide any food mishaps. Plus, the contrast makes for a nice focal point.
The fridge started out white, but then we decided to paint it with chalk paint for a fun kids activity.

I found several tutorials about using marble wallpaper on the counter top, but, after doing most of it, decided I hated it. (I used it on the bedroom nightstands instead).
We painted the counter top black instead! We tried it on the dinette table first and liked the look, so just went for it.
Two coats of black paint and about 6 coats of clear Polycrylic later, I loved the way it turned out!
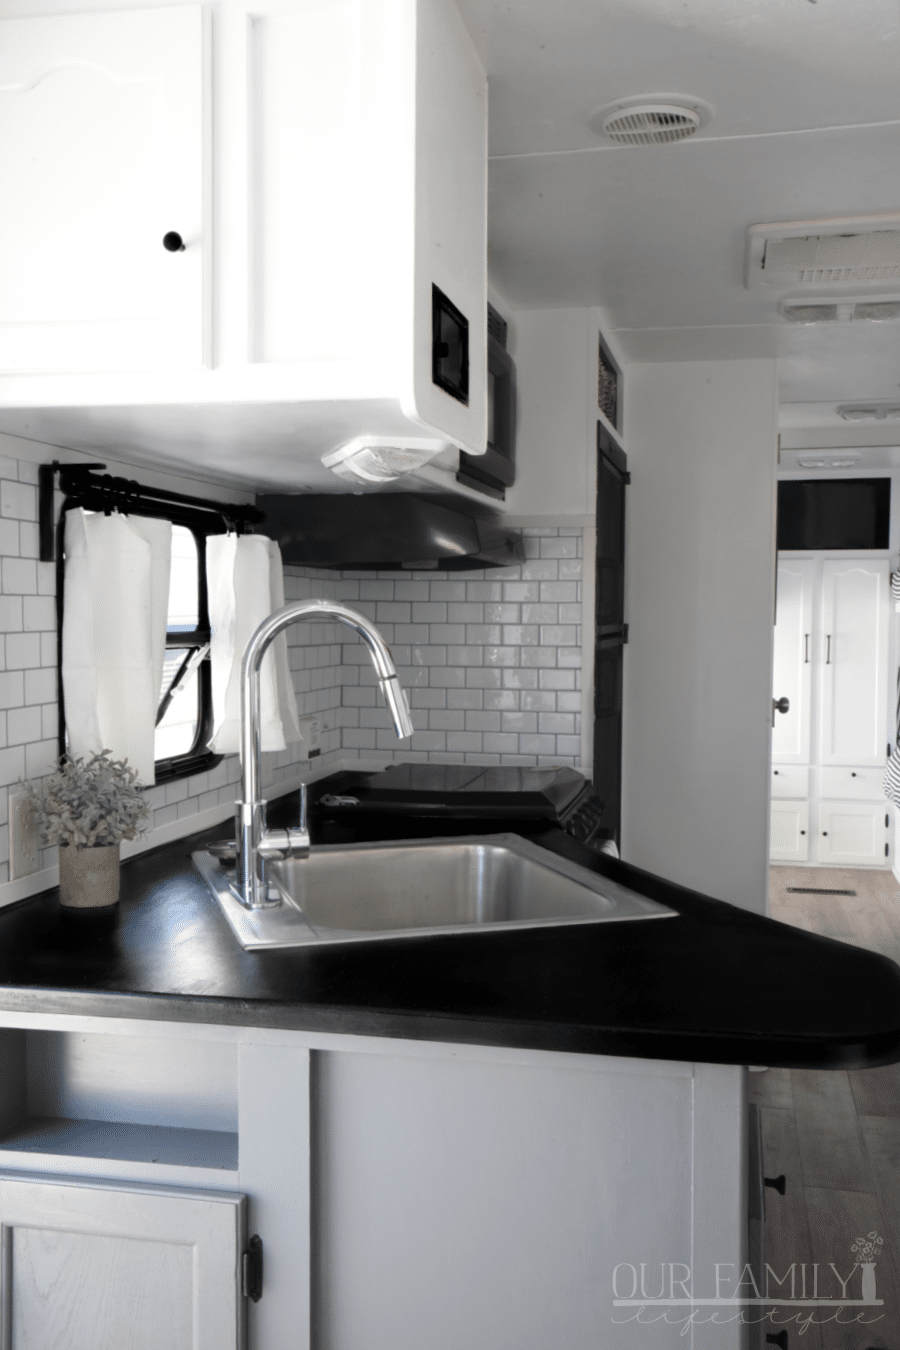
The last two finishing touches in the kitchen, for now, included a new single bowl sink + faucet, and new peel-and-stick tile backsplash.
I’m honestly not sure which was easier to install.
The next big renovation was the bathroom. The fact that it is tiny is exactly why we had to work on it next.
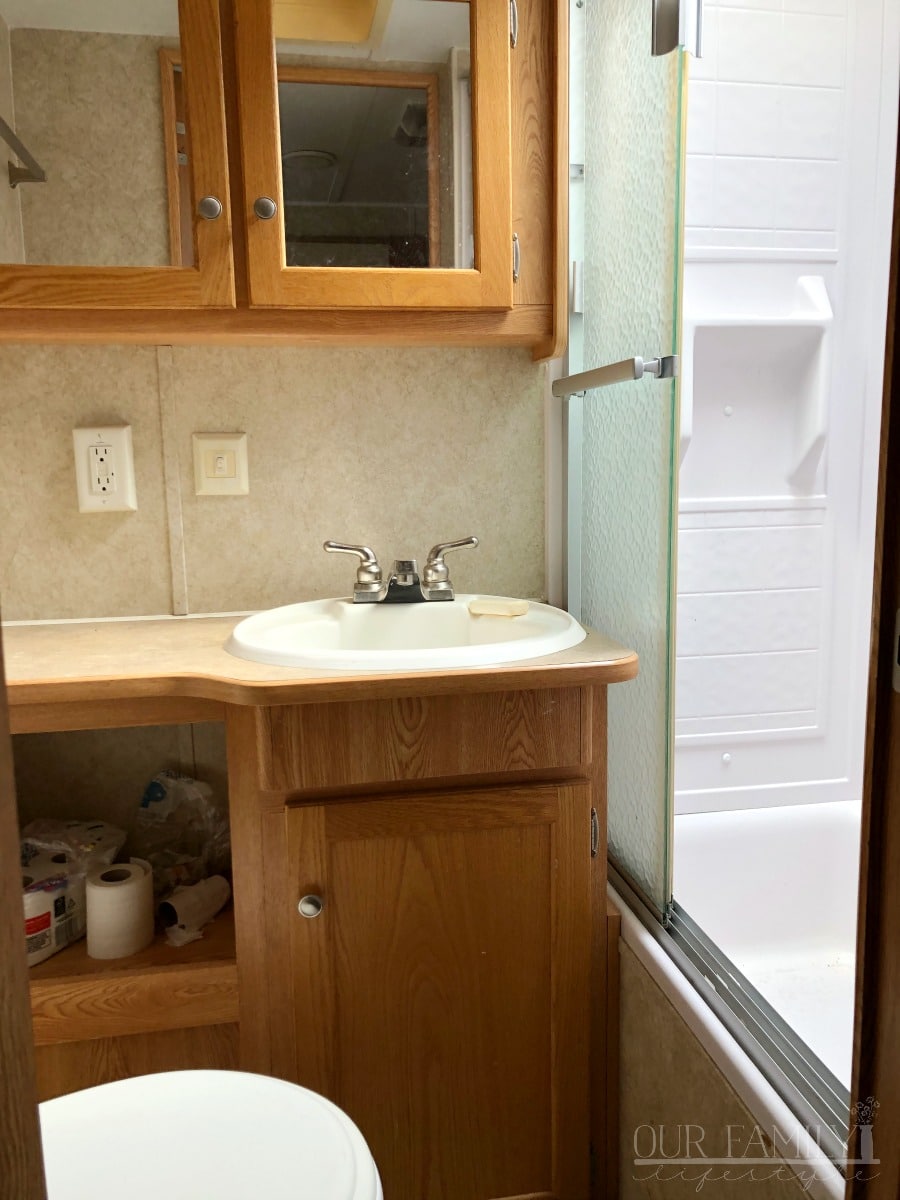
The original vanity took up a little too much space for my liking. Plus, it, again, was outdated.
We took it out and were able to shave off about 4 inches of space with a new IKEA sink and vanity. And it just looks 100 times better!
We added three shelves between the wall and the vanity for storage and hung a wall mirror in place of a medicine cabinet.

That mirror? First, it came from IKEA as well. We originally used it year's ago in this bathroom makeover.
Second, we used a TV wall mount to hang it!
We were racking our brains on how to hang it safely, due to thin walls in RVs, and this idea popped into my head.
I wasn’t sure, but when I told Colby he went to work on researching it. Looked at all the options; then just did it.
I can tell you after driving her over 4,000 miles through some bumpy, mountainous terrain, that mirror didn’t budge!
Moving on...
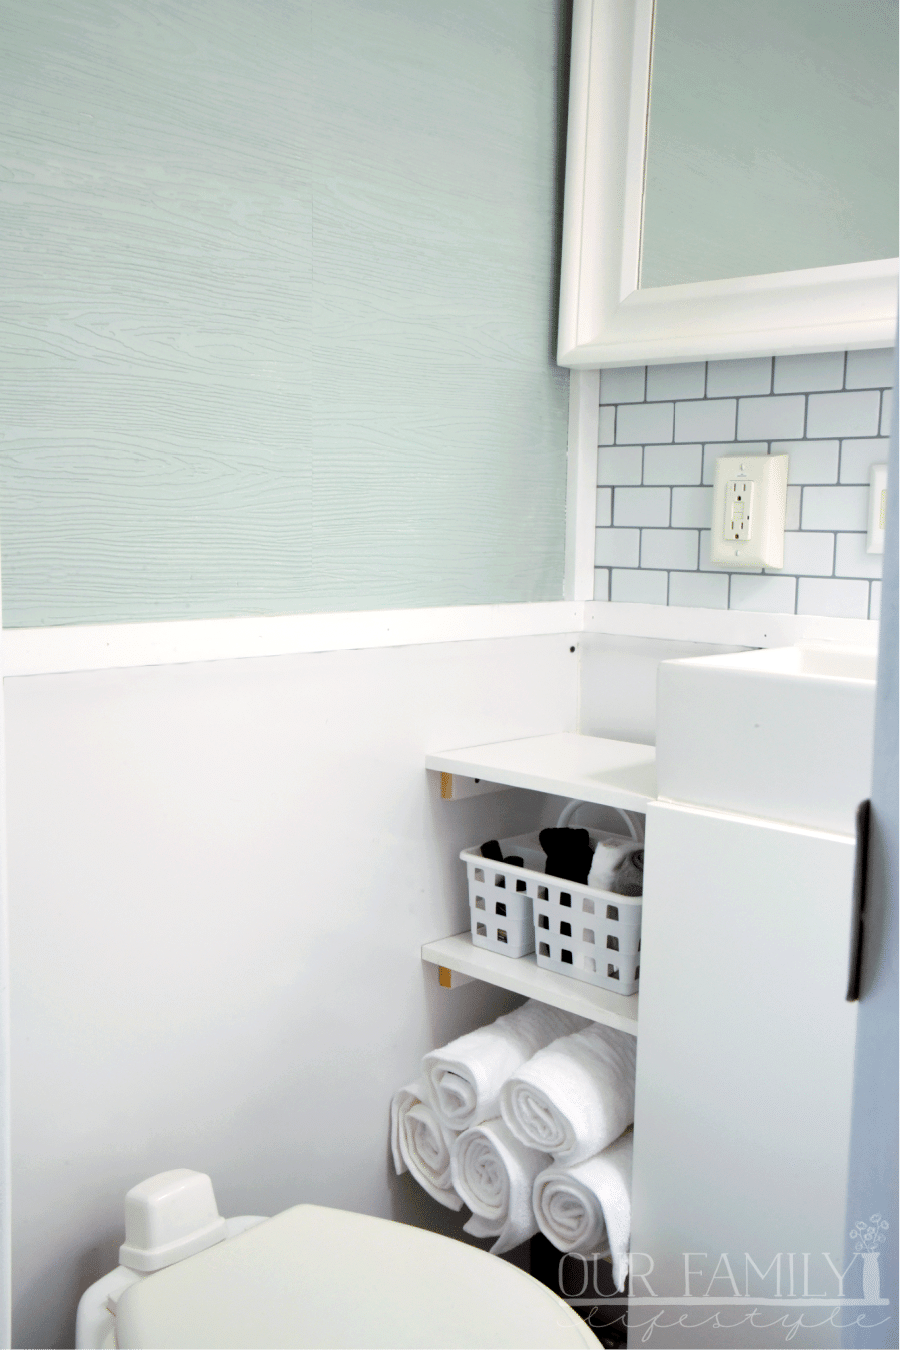
For the bathroom walls, we used a glossy, moisture-resistant wall panel on the bottom half behind the toilet and a paintable wallpaper on the top. The two sections are divided by a chair rail and 1”x 2” trim finished off the look.
We replaced some of the plumbing and painted everything else white. Oh! And we replaced the yellowed RV shower head and faucet.
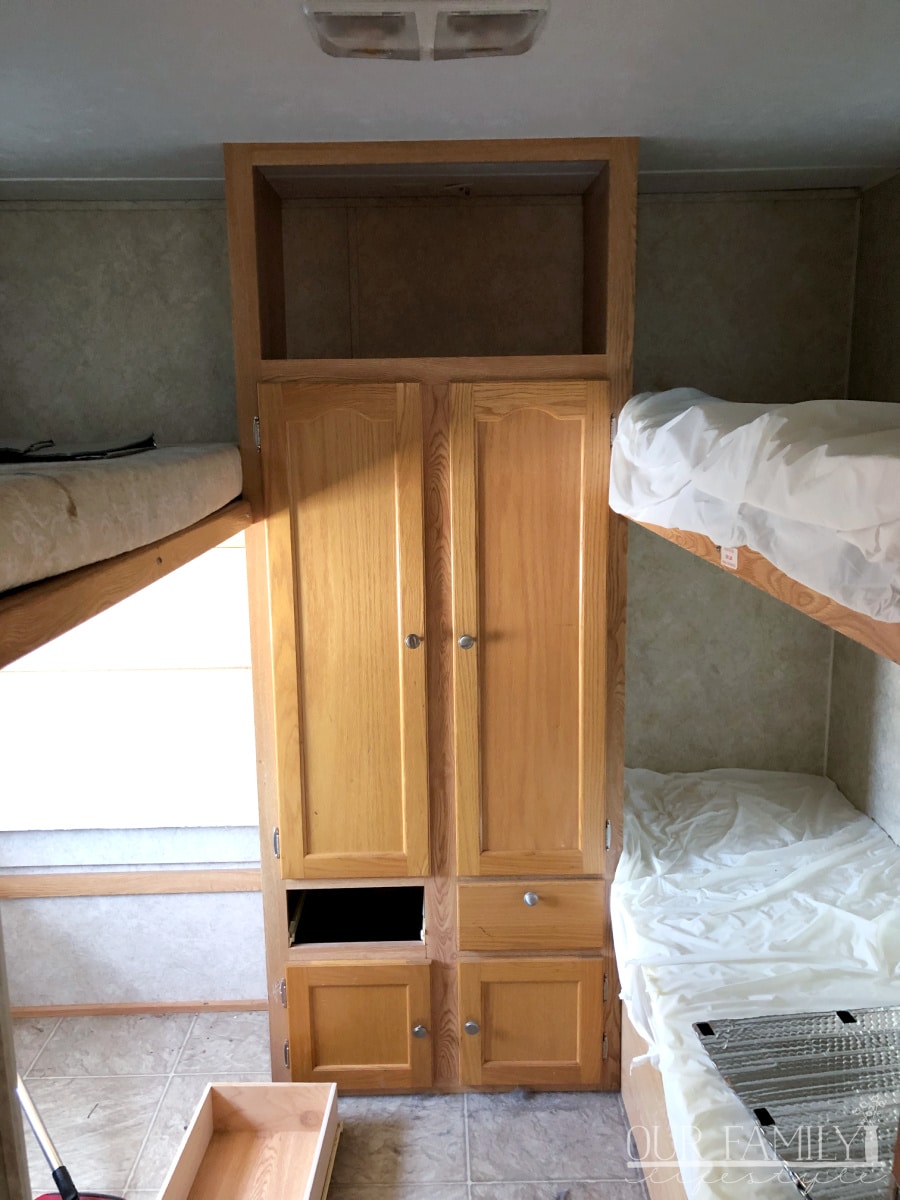
On to the bunkhouse!
This was my main draw to this particular trailer. We needed space for the girls.
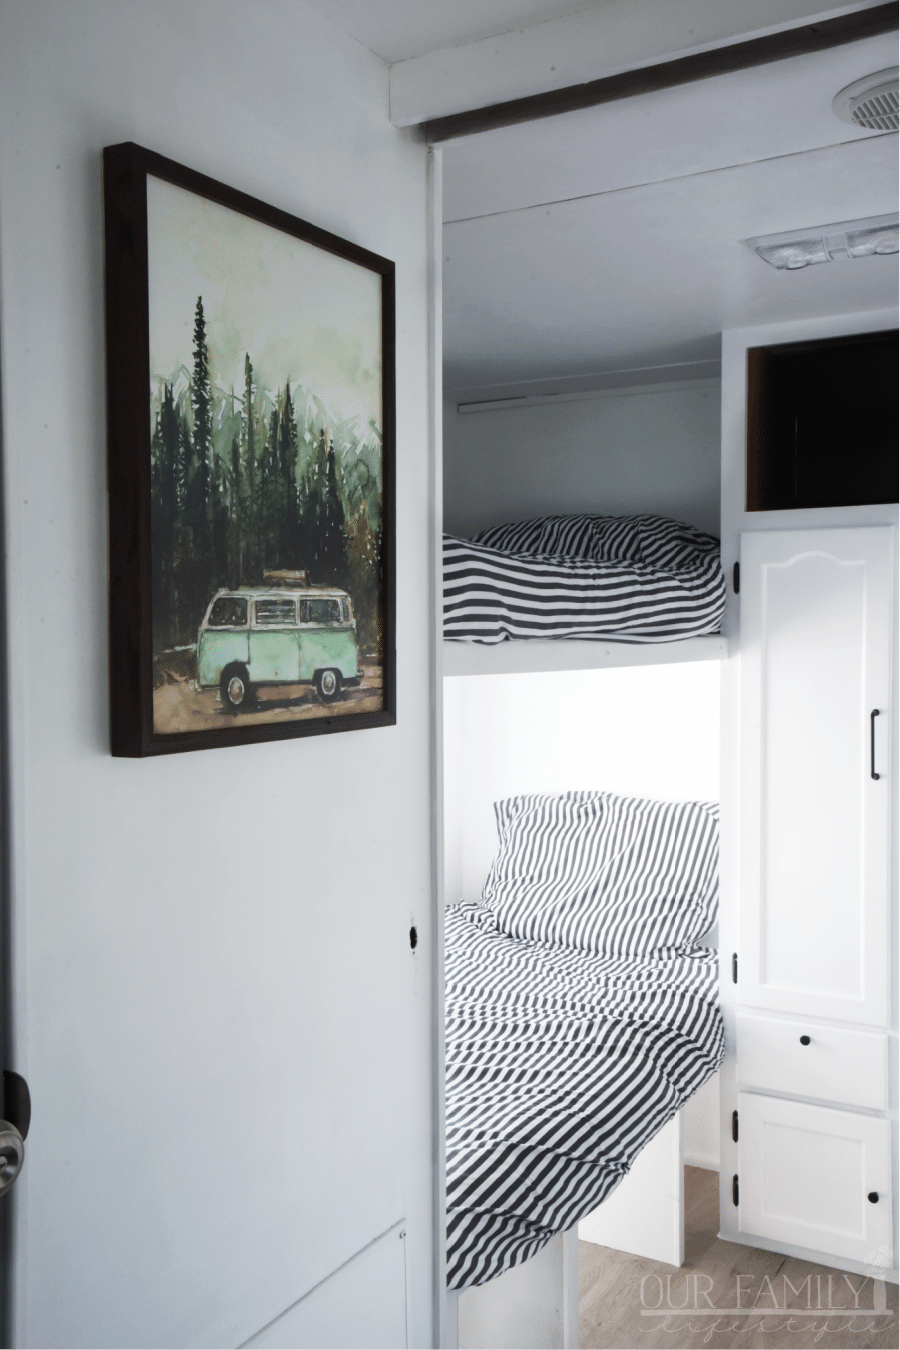
Because we manage RV rentals, we know that most trailers only have two bunks. Sometimes a third that pulls down.
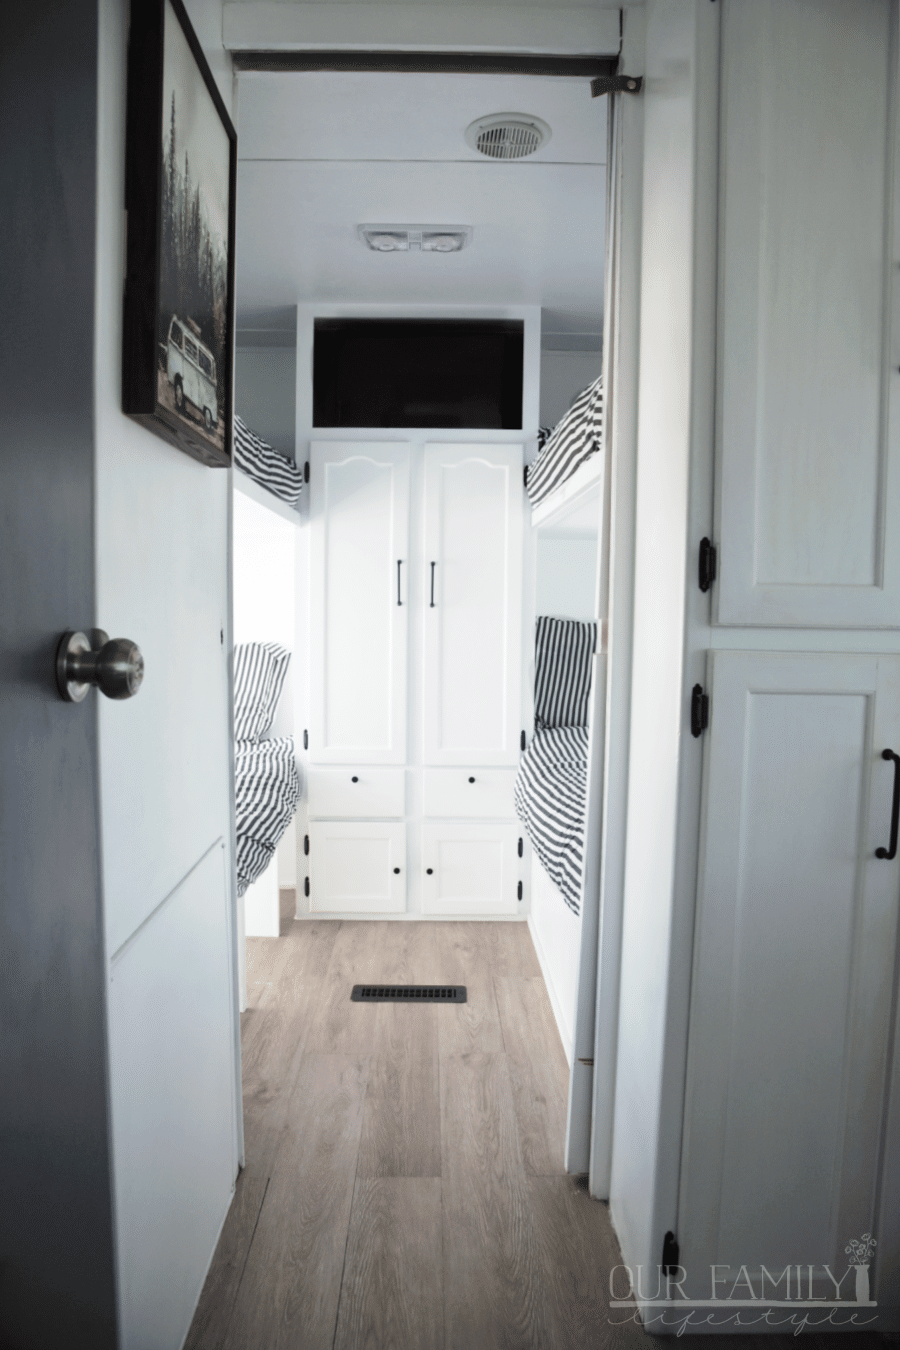
We loved the idea of four.
Not to mention, it had a closet and TV space, so we knew the girls would enjoy those features.
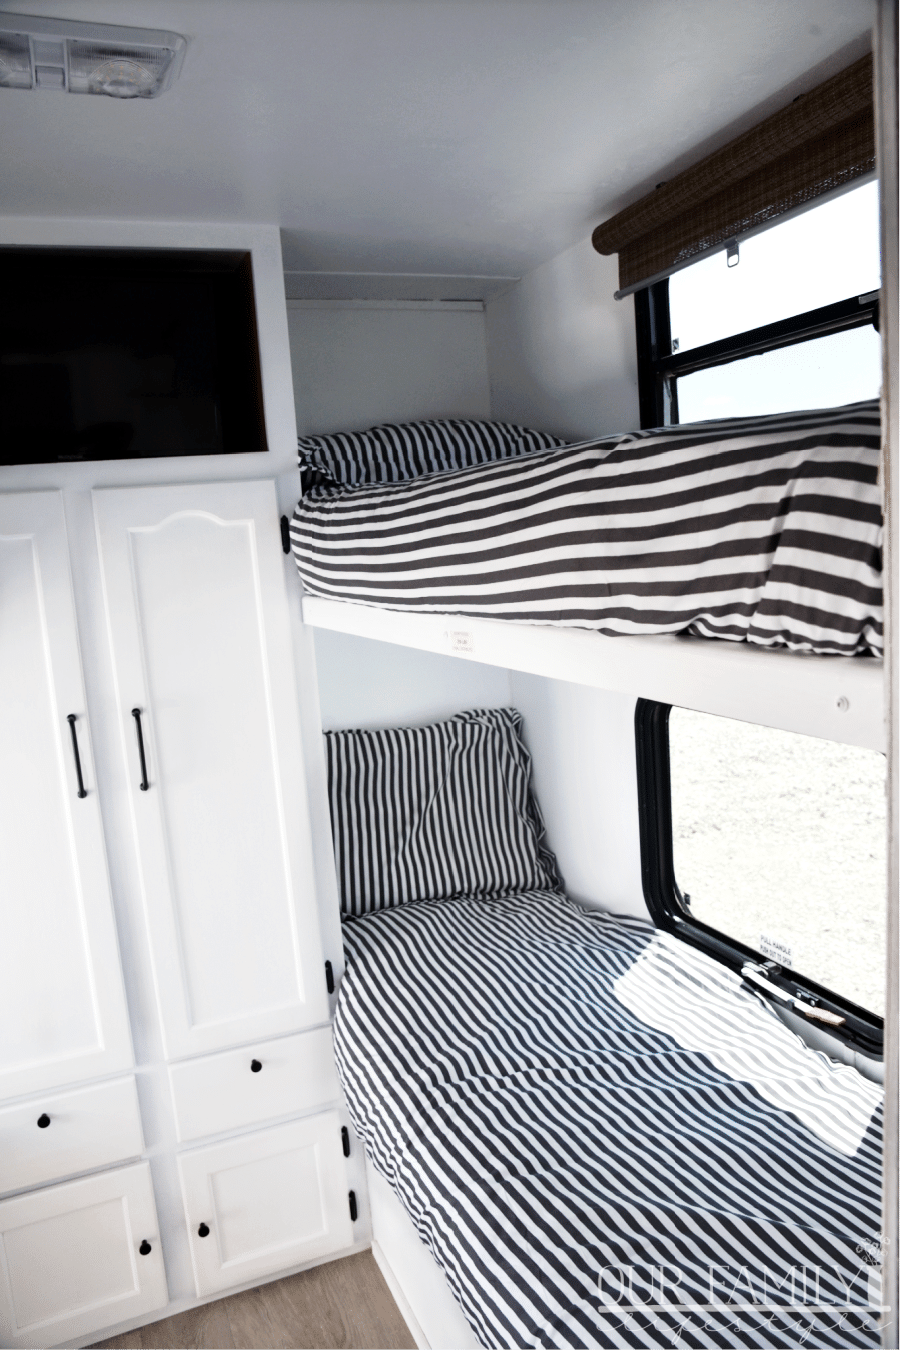
Other than paint, flooring and new black cabinet hardware, we didn’t need to do much in the bunkhouse.
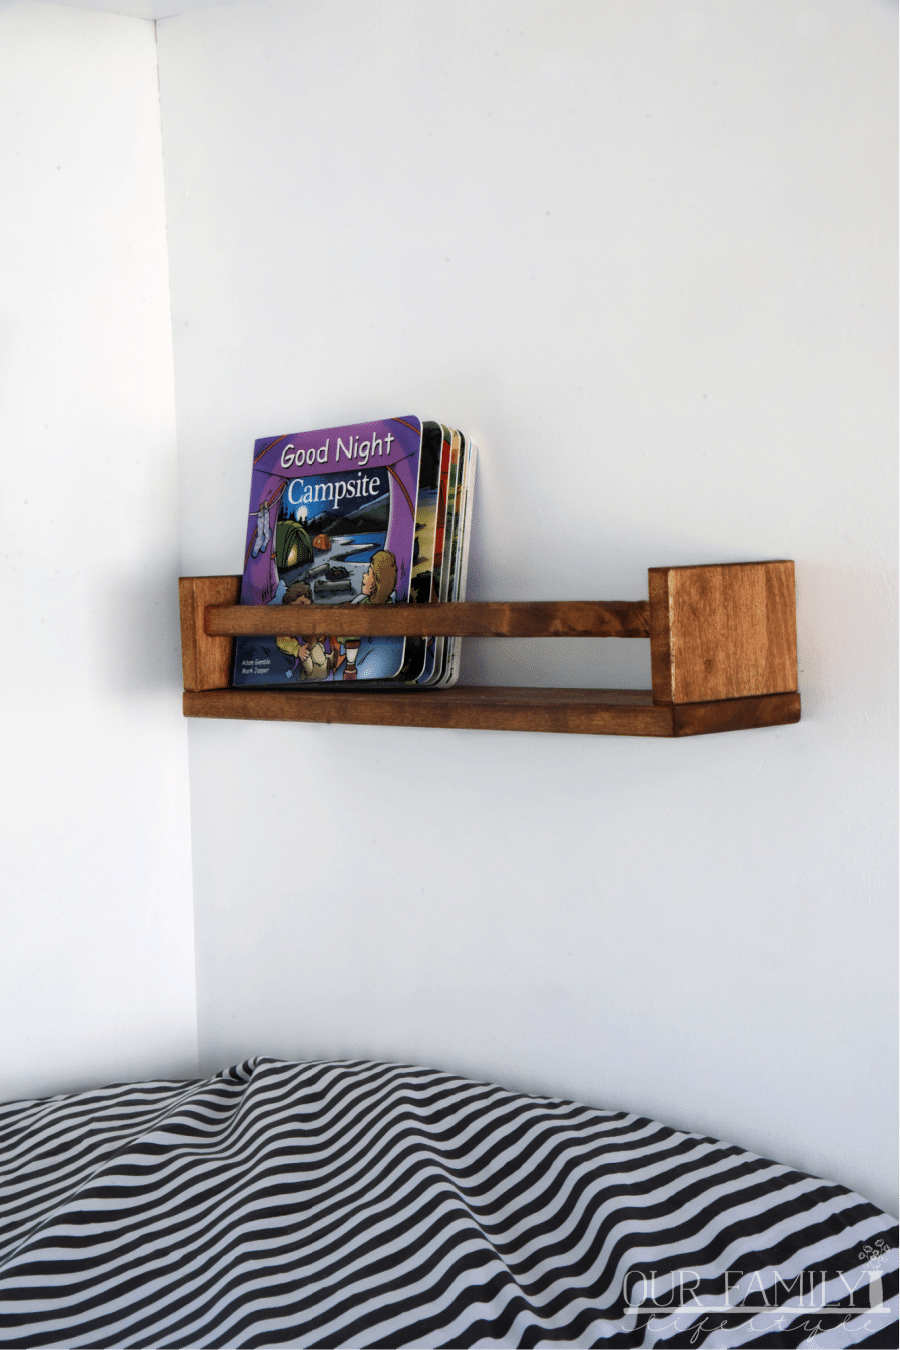
New bedding was the biggest design piece in the room, other than a bookshelf for three of the four beds.
The fourth can’t have one because of the functionality of the bed when used for storage.
Yes, I know I said I don’t like watching TV, but I do understand that it can be helpful when kids are on board.
So, we put a small TV with a DVD player in the back. They appreciated it on our first trip.
Circling back into the main area, all of the kitchen and drawers were outfitted with new hardware.
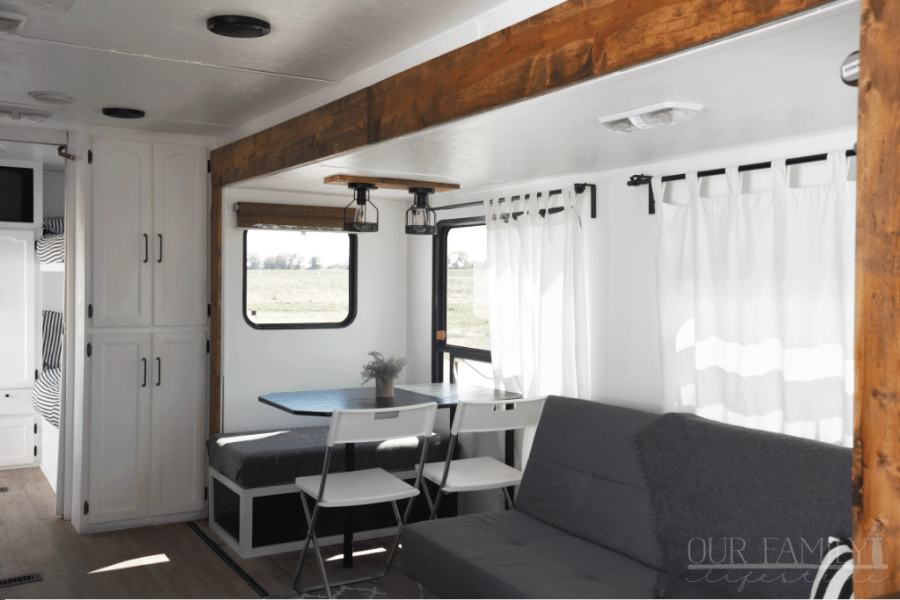
All of the windows were covered with either IKEA blinds or curtains. (Unfortunately they no longer sell the ones we purchased. The link leads to a similar one).
(And, yes, most of the trailer was furnished with pieces from IKEA. Affordable, light, and efficient. Plus, their Click and Collect worked well for us during the pandemic).
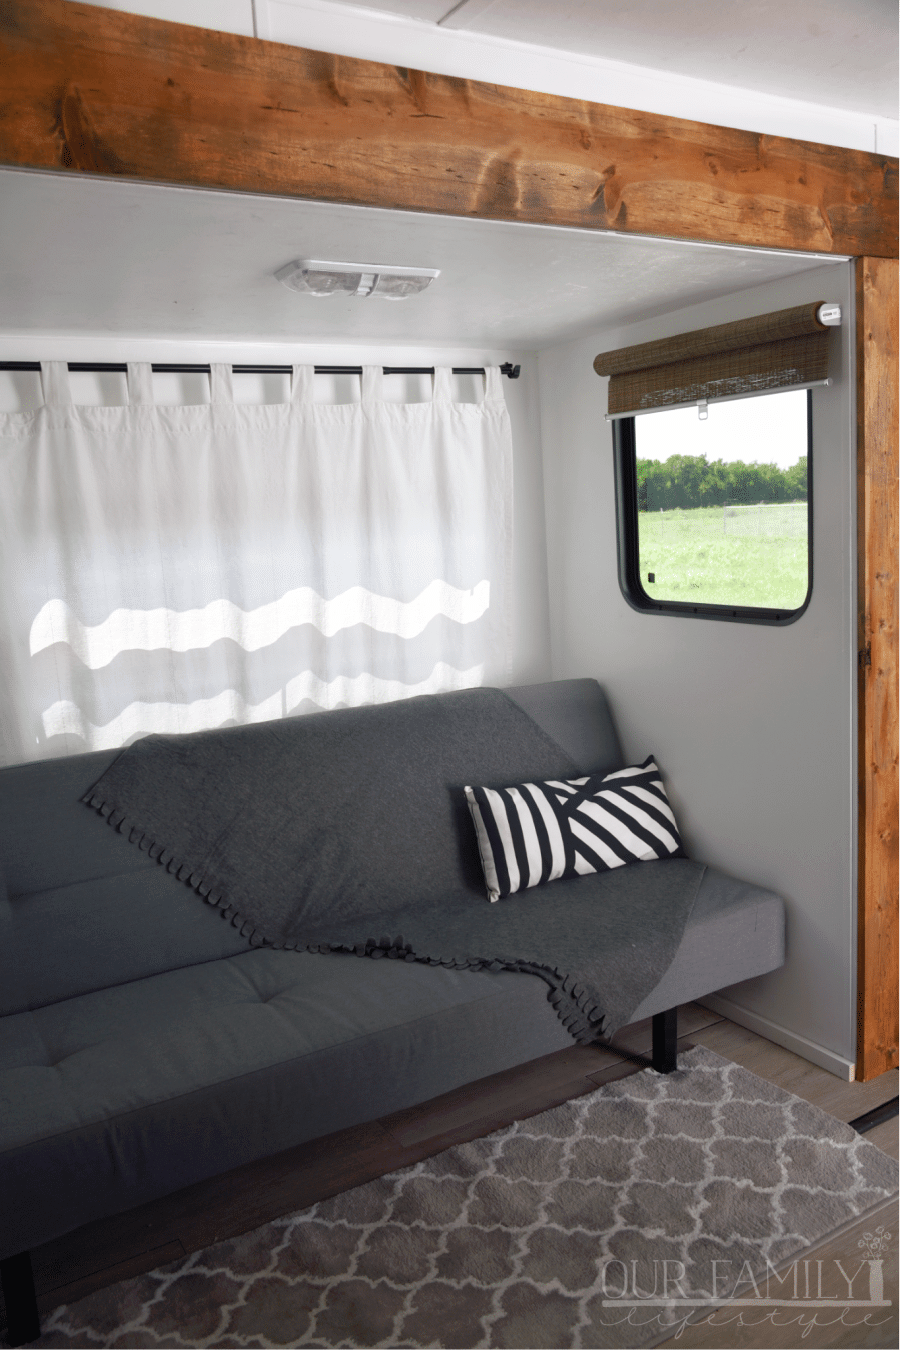
The sofa we took out? Replaced with a futon from IKEA. It was lighter. Thinner. And would still sleep two. The blanket and throw pillow are also IKEA.

As for the dinette; we saved the benches and refurbished one. We took off the back, shiplapped the bottom, and recovered the bench cushion.

We then bought 4 fold up chairs (from IKEA) and stowed them away in the (fixed) bench. This gives us four extra chairs to pull out, when needed.
Both of these renovations removed a lot of the weight from the slide.
The light above the dining area gave us a run for our money. I wanted something different, but practical.
I searched, quite literally, for months.
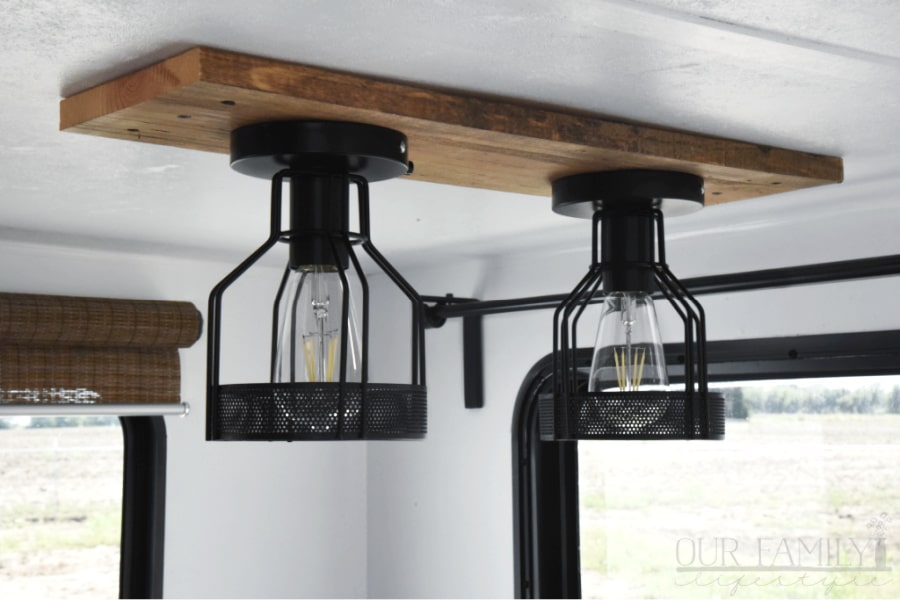
Then, we decided to create something ourselves with two light fixtures we finally agreed on. And I loved the way it turned out!
The removal of the entertainment center also alleviated some weight. When renovating an RV, it’s all about using light materials, while paying attention to the gross weight of the trailer.
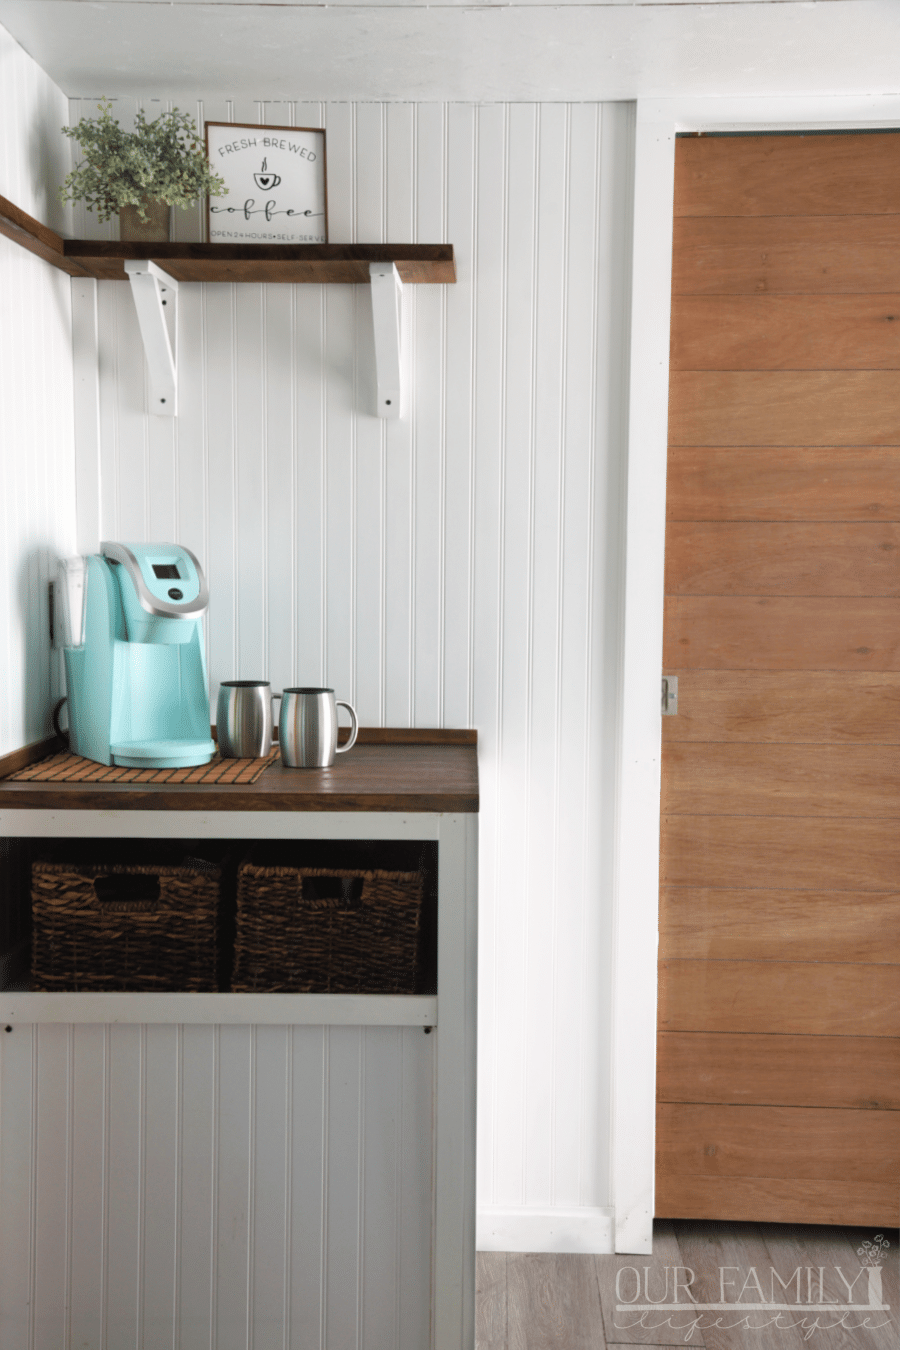
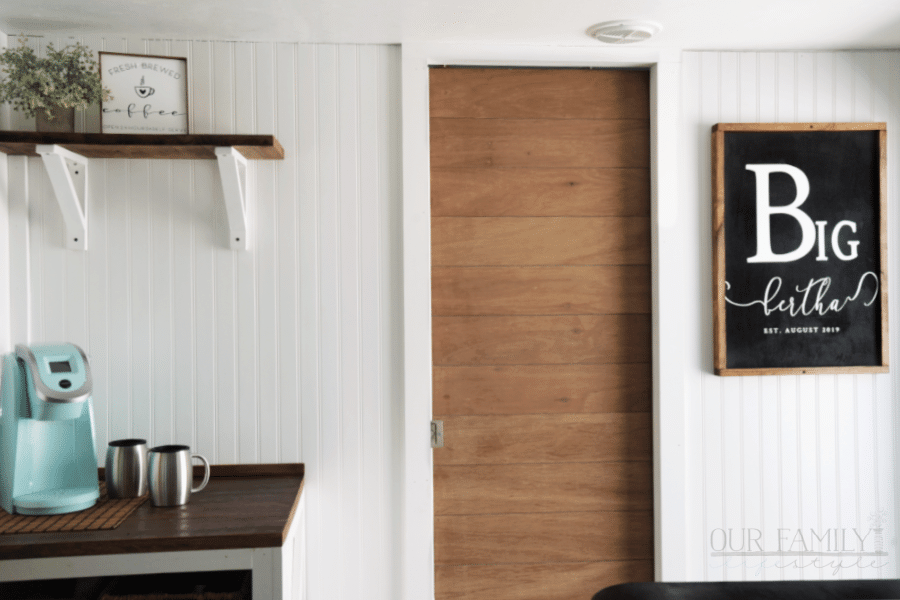
Speaking of the entertainment center, it’s now one of my favorite spots in the trailer: a coffee bar.
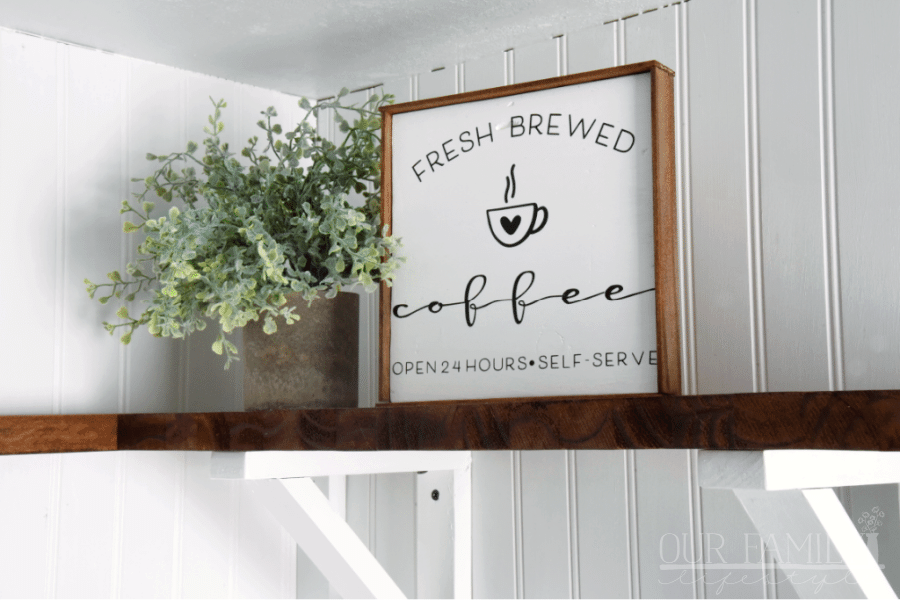
I get that not everyone loves coffee, but I do, and it’s my trailer, so I wanted a coffee bar.
Colby truly took my design ideas here and ran with them. It turned out beautifully!
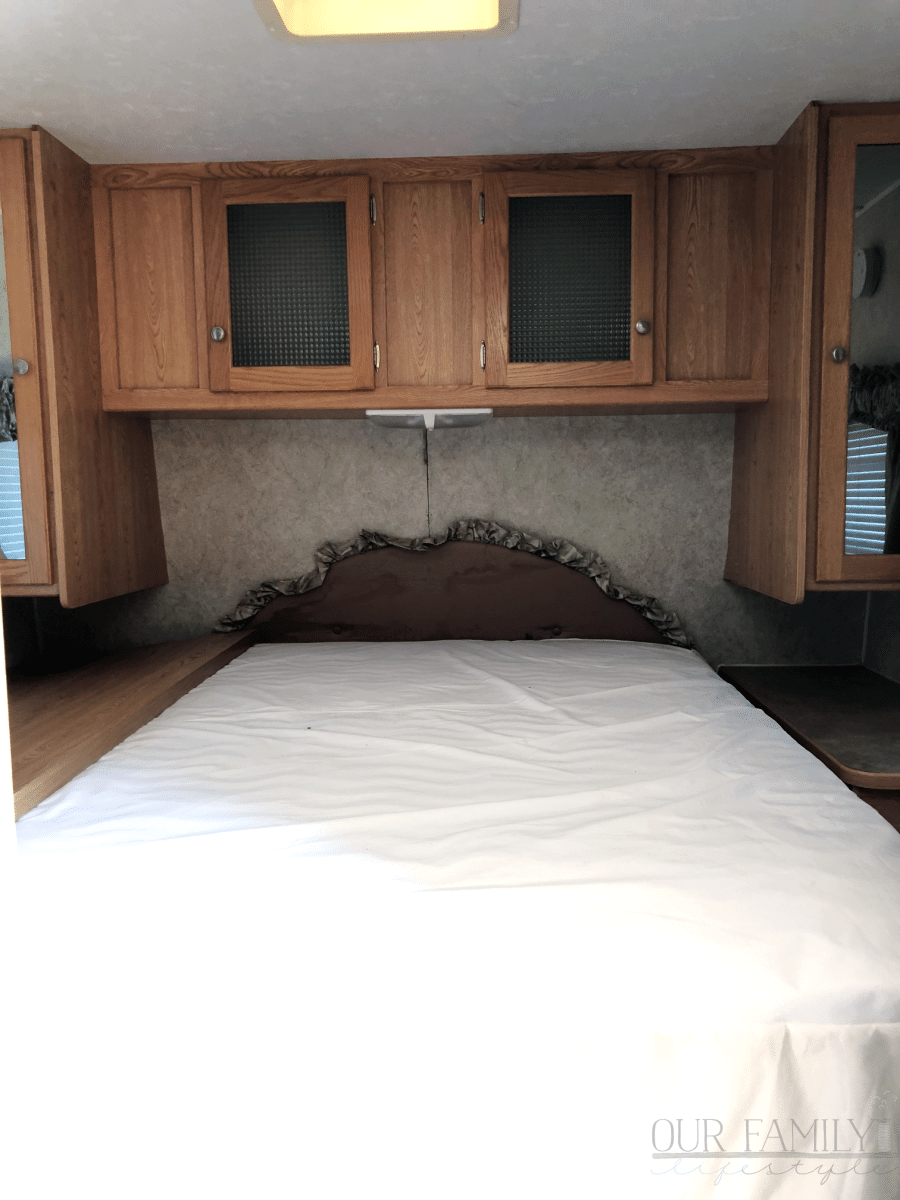
Moving into the main bedroom, we realized after utilizing the room on our first trip, it’s really not laid out well.
The previous owners replaced the RV queen mattress with a regular size one. Which, while great for sleeping, is not ideal for space.
Squeezing in and out of the space is a challenge.
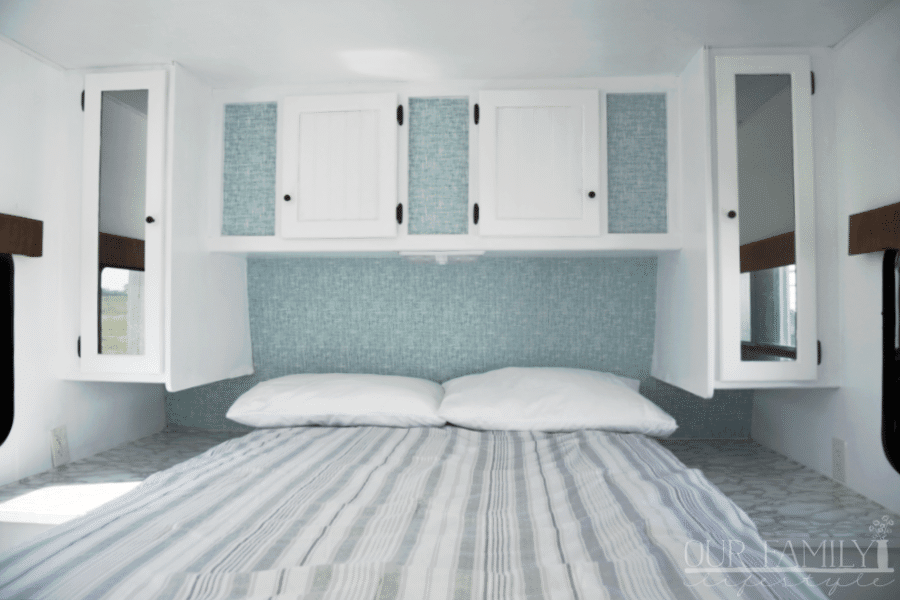
Therefore, it still has some renovations coming. But, for now, it’s painted white, we put a headboard lock plate around the bed, and I hung a teal grasscloth peel and stick wallpaper to serve as an accent wall.
I pretty much love the wallpaper! Best part? It was actually easy to hang.
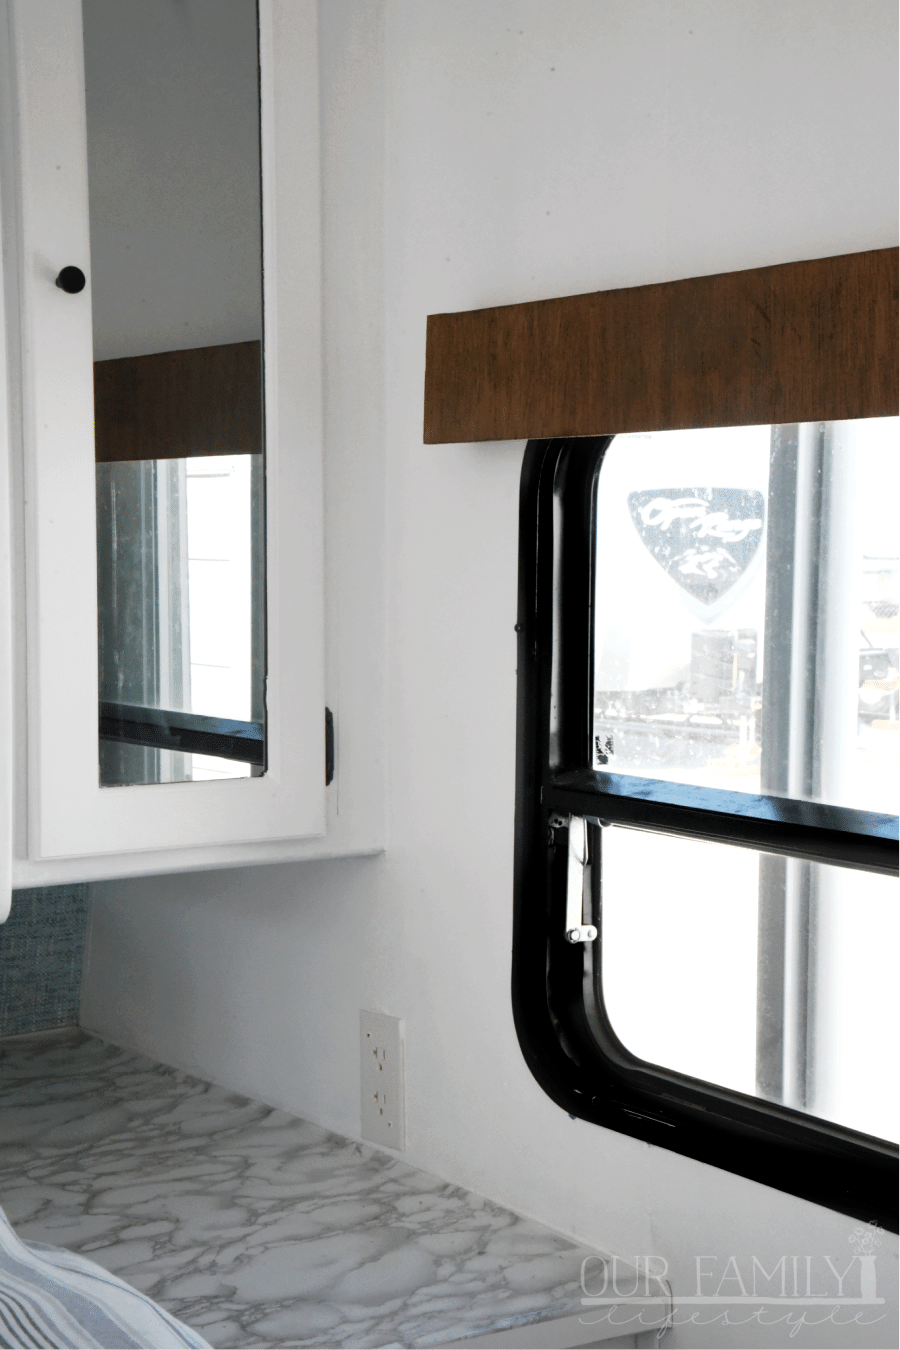
We made wooden box valances out of lightweight lauan and attached IKEA blackout shades to them.
The door was already on a sliding track, so I decided to give it a barn door look. We painted the bedroom side white and (again) used stained lauan to make a faux shiplap on the other side.
Again, I couldn't be more pleased with the way it turned out.
It literally changed the entire look of the main area of the trailer.
It’s sufficient for now, but we’re definitely looking to change the footprint of this room next.
I’ll keep you updated.
Otherwise, we added a Bluetooth radio, speakers, new air vents, and new RV ceiling lights throughout. We painted anything not replaced.
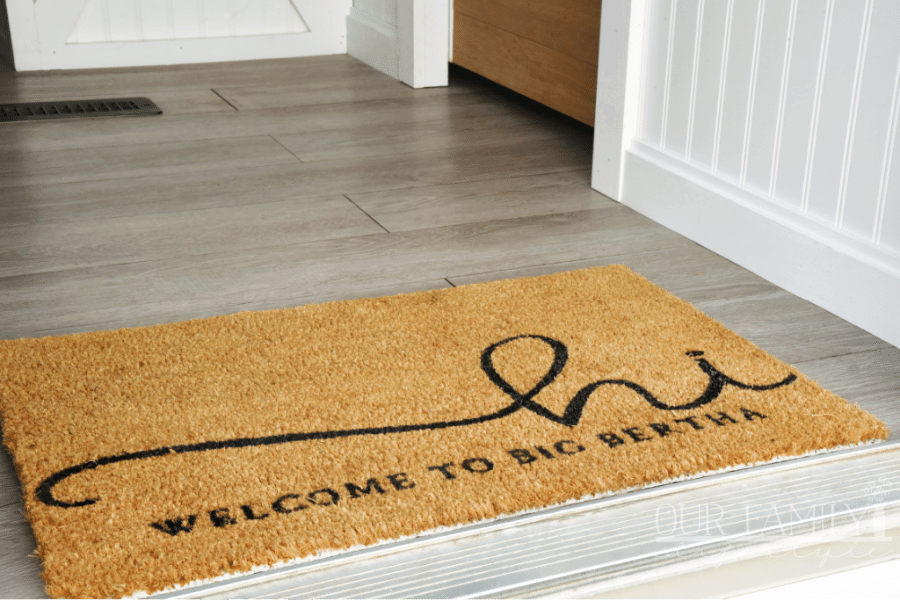
Finally, the entryway. It’s the main focus point when you walk in the door.
It’s where I wanted the name of the trailer prominently displayed. And it is.
“Big Bertha.”
She’s named after my mom.
In all honesty, she hated the nicknames often associated with her name. This was one of them. But, I know she would have got a kick out of it being used in this sense.
I knew the name for her the minute I saw the Marketplace listing. I knew before I asked Colby and my Dad to drive to Kansas to pick her up.
I just knew.
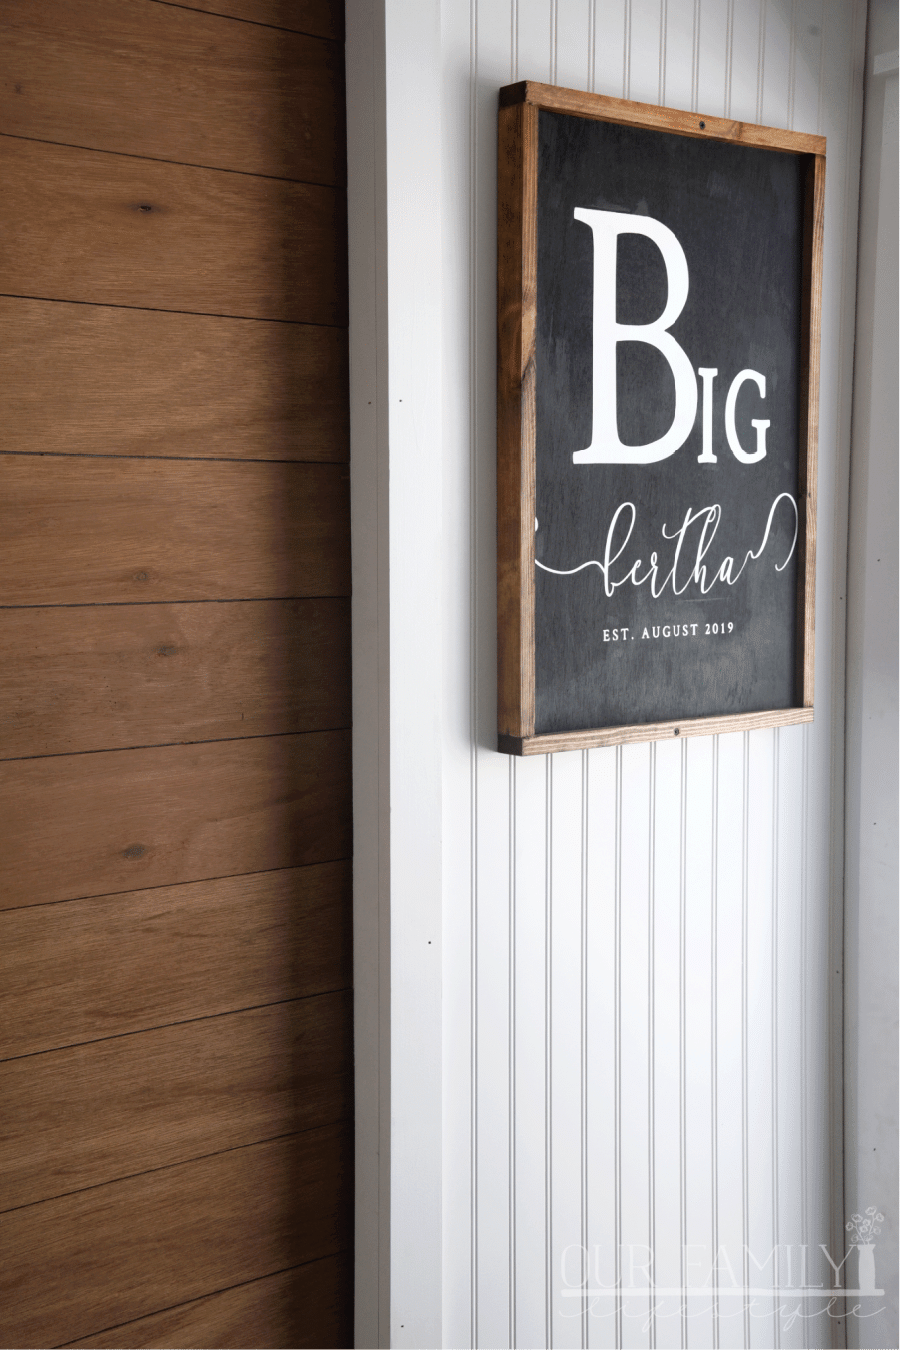
Hanging the sign in the RV the night before we left was incredibly emotional and healing for me.
I love being able to continue honoring and remembering my mom that way.
Hoping to make many more memories in the years ahead with “Big Bertha.”
For now, we’re simply excited to have her (mostly) done and to have been able to really test her out on a 4,000+ mile road trip!
She took us 122 hours over 36 days… over the course of a year... to complete. Yes, I tracked every minute simply because I wanted to know.
Next project?! The exterior!
Stay tuned...
amzn_assoc_placement = "adunit0"; amzn_assoc_search_bar = "true"; amzn_assoc_tracking_id = "7onashoe-20"; amzn_assoc_ad_mode = "manual"; amzn_assoc_ad_type = "smart"; amzn_assoc_marketplace = "amazon"; amzn_assoc_region = "US"; amzn_assoc_title = "Shop the Post"; amzn_assoc_linkid = "b9fe5dd7b6aa80c6ccf66668cff4f9f7"; amzn_assoc_asins = "B07KSK4SKB,B004NBDLYE,B07FQSS4QS,B07C2JRCF8";