Did you see our new kitchen? Okay, it may not be new, but it looks like a completely different kitchen thanks to our partnership with The Home Depot, right?
Not sure what I'm referring to? Head over to see how we transformed our builder grade kitchen into a farmhouse kitchen!
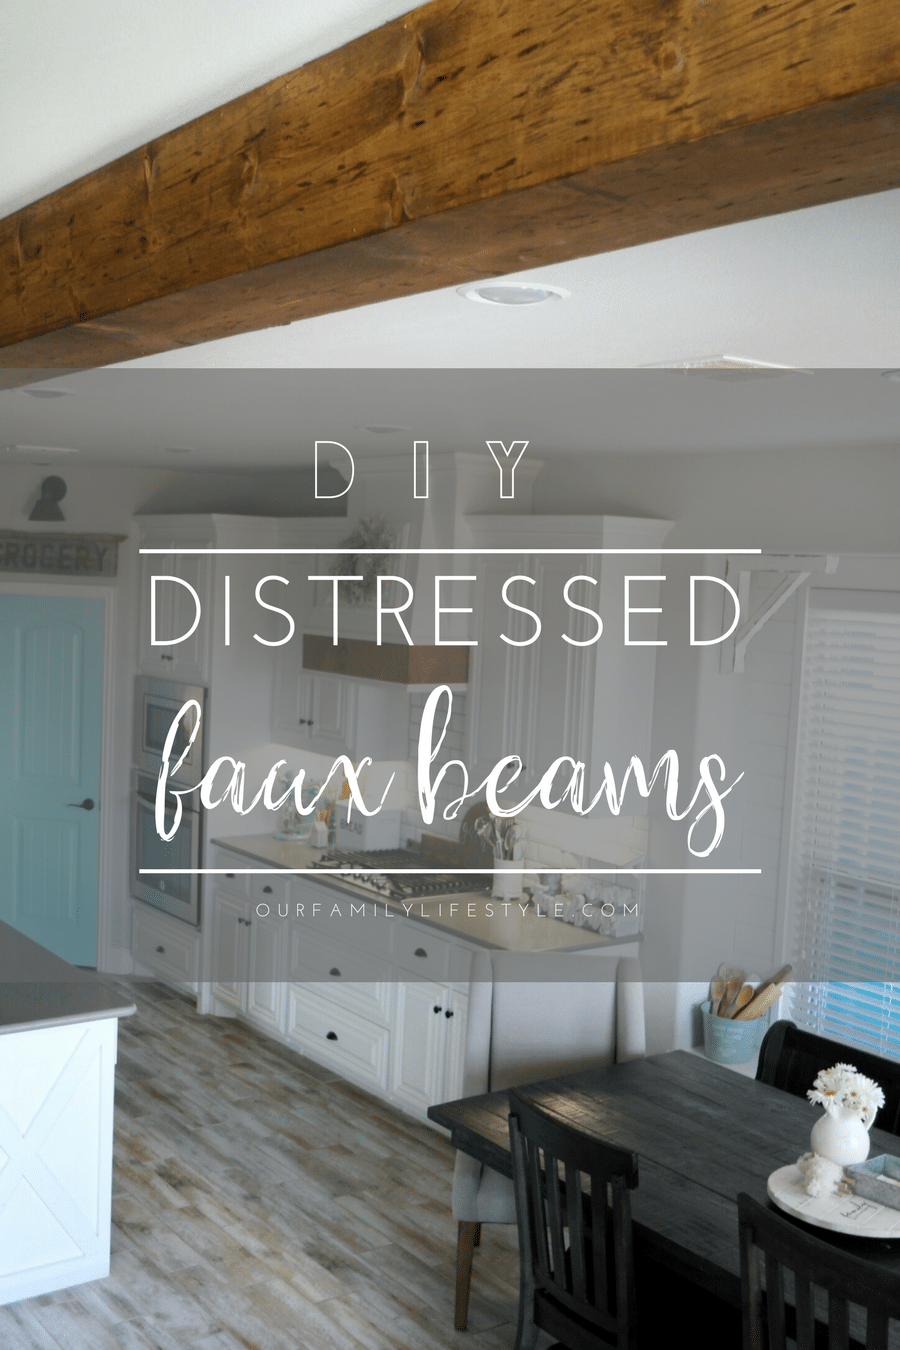
Faux Beams DIY
Two of my favorite parts of the whole restyle are the DIY distressed faux beams in the kitchen.
[mv_video doNotAutoplayNorOptimizePlacement="false" doNotOptimizePlacement="false" jsonLd="true" key="um88umtnshgnek7cbz0u" ratio="16:9" thumbnail="https://mediavine-res.cloudinary.com/v1632845962/z6njwu3mpvtuzk9fk51y.jpg" title="DIY Distressed Faux Beams" volume="0"]
What type of wood is used for faux beams?
Y'all, we took three common pine boards, beat them with chicken wire (because it's what we had on hand) and a large chisel, stabbed them with a screwdriver, and ran a hand weeder down them.
How do you make a fake hand-hewn beam?
We wanted to give the wood beam a good rustic look, and this was one way we found to make faux beams.
I think Colby had a bit of fun doing this actually; especially when it came to the chicken wire. It looked like a great stress-relief exercise if I'm being honest.
How do you make a faux barn beam?
In fact, in addition to beating the wood with the rolled bunch of wire, he would also grate the boards with it. Basically, these beautiful distressed ceiling beams now hanging in our kitchen are faux hand hewn beams.
I kinda love that!
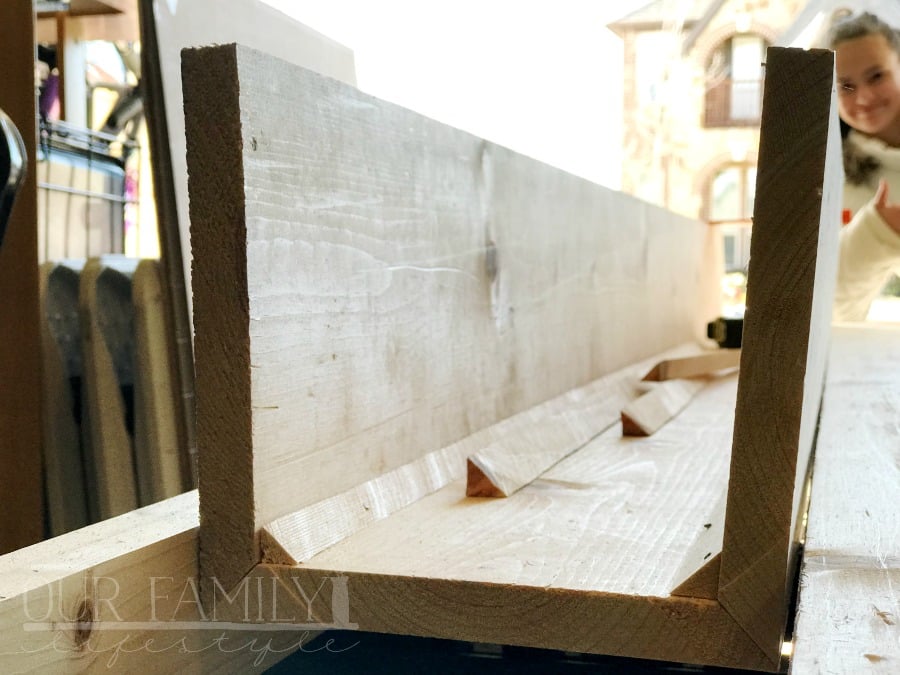
Once we had all of the wood distressed to our liking, it was time to assemble the decorative faux beams.
How do you make faux wood beams?
Colby cut one side of two boards at a 45° angle. The middle board needed two 45° angle cuts on each of the long sides.
How do you make a box beam ceiling?
Then, he lined each angled side up to make a U-shaped, three-sided faux beam from wood. Using the angled cuts trimmed from the side boards, he added some stability to the beams by nailing the pieces inside as shown above.

How do I make my ceiling beams look like wood?
Next, it was my turn. We tried two different wood stains to see which we liked best (Jacobean which we used on our farmhouse table and Early American).
After letting the stained wood beams dry overnight and putting it to a vote on Instagram, Minwax Early American won.
Good thing because it was my favorite as soon as I applied it. Therefore, I stained the outside of each distressed ceiling beam with a wood finish.
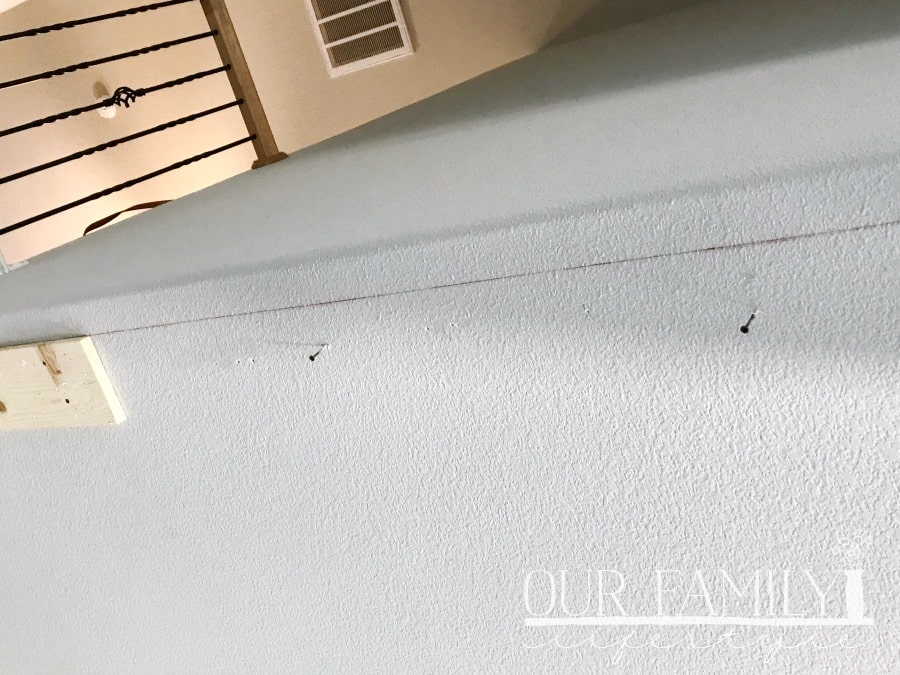
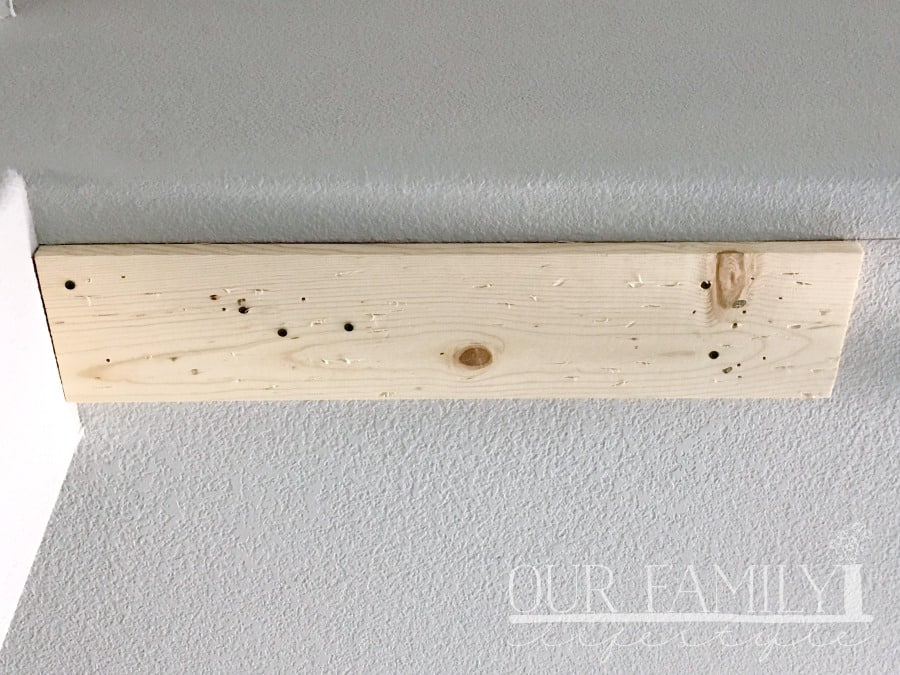
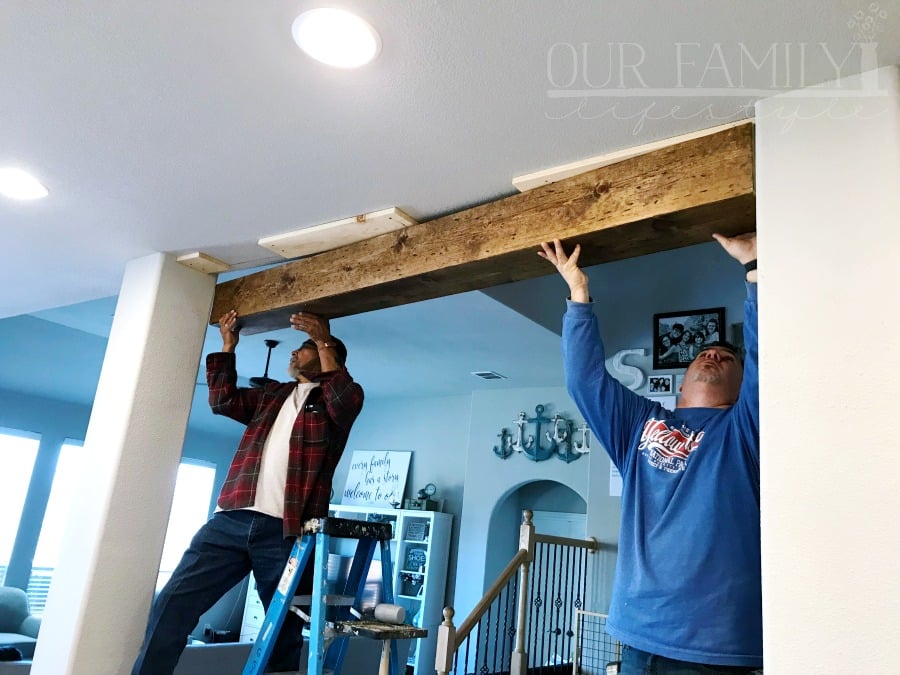
After they all dried completely, it was time to bring the DIY faux beams inside to hang on the ceiling. Now, as exciting and easy as that may seem, it was a bit of a chore for us.
How do you attach faux wood beams to the ceiling?
My dad is a retired carpenter. Therefore, we worked under his guidance during this process.
Now, perhaps our idea of building codes was a bit skewed, but we were looking for the ceiling joists to be every 16" to 18". That wasn't the case in our ceiling. We weren't getting a reading using our stud finder, so we had to go old school—drilling until we hit something solid.
We would then measure and drill again. We soon discovered our joists were anywhere from 21" to 24" apart.
Can you add wood beams to the ceiling?
So, once you can determine where your joists are, it's time to attach the cleats that you will be nailing your beams into place with.
We popped a chalk line to keep us straight as far as the outer edge of the cleats and began screwing the DIY faux wood ceiling beams into place.
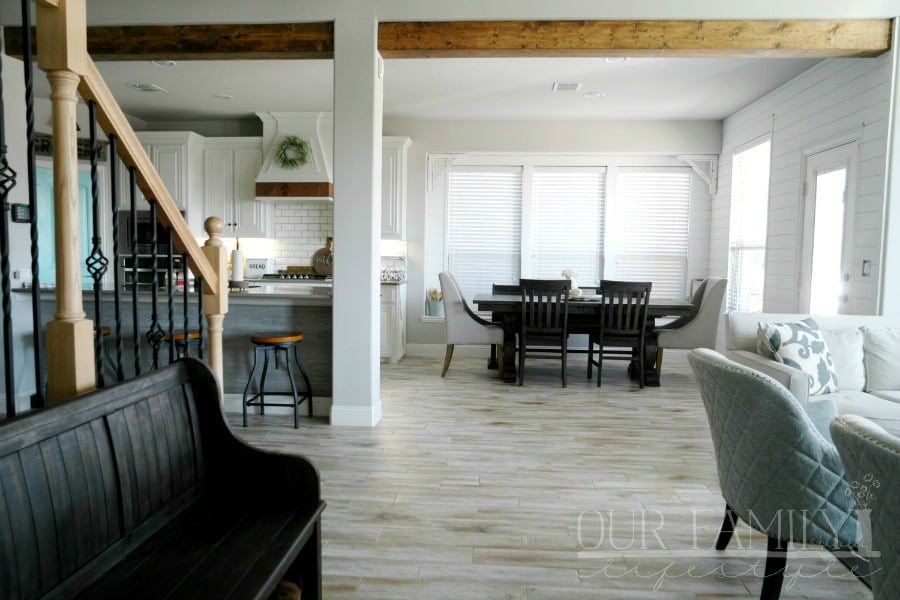
You're done! I mean, I had to do some touch-up paint on the columns because it was a tight fit with the beams (which was intentional) but otherwise, this is the last step!
Are wood beams in style?
And the difference? WOW! I have envisioned these faux wood beams in the kitchen ever since we were building.
I knew exactly where they would go and could not wait to see them in the space. I knew they would look fabulous–and I was totally right!
How to build a ceiling beam?
Building a ceiling beam is a simple process that anyone can do with just a few tools and some basic materials.
Building a ceiling beam is a simple process that anyone can do with just a few tools and some basic materials.
By following the steps above, you can easily add a beam to your ceiling, which can add both support and add beauty to your home.
How to build a false ceiling beam?
Building a false ceiling beam is a great way to add character to your home. Pine boards are the perfect material to use for this project because they are easy to work with and give a rustic look.
Here is an easy step-by-step guide on how to build your own false ceiling beam:
- Cut your pine boards to the desired length and width.
- Attach the boards together using screws or nails.
- distressed the boards by sanding them down or using a chemical stripper.
- Paint or stain the beams to the desired color.
- Install the beams by attaching them to the ceiling joists.
How do you attach wood beams to a ceiling?
There are a few different ways to attach wood beams to a ceiling.
The most common method is to use wood screws. You will need to pre-drill pilot holes in the beam and use long wood screws to attach them to the ceiling joists.
Another method is to use hangers. You can either use Simpson Strong-Tie hangers or joist hangers. The hangers will need to be screwed into something solid like a joist or a stud in order to be secure.
The last method is to use nails. This is the least recommended method because it is not as secure as the other two methods.
You will need to use longer nails and make sure that they are going into something solid like a joist or stud.
Whichever method you choose, make sure that the beam is secure before moving on.
Which way should faux ceiling beams run?
If you are looking to add some character to your home with some DIY distressed faux beams, you may be wondering which way they should run.
The answer may depend on the overall look you are going for and the specific ceilings in your home.
Some popular choices for beam direction are running them perpendicular to the joists or in a herringbone pattern. If your beams will be visible from below, you'll want to take the time to make sure they are installed level.
If you are going for a more rustic look, you may want to consider irregularly placed beams or even some that slightly overlap.
Whatever your choice, make sure that you take into account the support structure of your beams before making any final decisions.
Do faux beams look real?
Whether or not faux beams look real is largely dependent on the level of detail and craftsmanship that goes into them.
When done well, faux beams can easily fool the eye and provide a realistic addition to any home.
Here are a few things to keep in mind if you want your faux beams to look as realistic as possible:
- Make sure the dimensions of your beams are proportionate to the rest of the room. Out-of-scale beams will look fake and out of place.
- Use high-quality materials. Cheap materials will look just that: cheap. If you want your beams to look real, use wood that is of a similar quality to the rest of the wood in your home.
- Pay attention to the details. Real wood beams are not perfect. They have knots, grains, and other imperfections. When creating your faux beams, make sure to include these details so they look as realistic as possible.
- Choose quality stains and finishes. The way you finish your beams will also affect how realistic they look. Take the time to experiment with different stains and finishes until you find the perfect combination.
- Finally, the way you install your faux beams will also affect their realism. Make sure the beams are properly supported and secured before attempting to install them.
Look at those faux-distressed beams and how much depth they add to the space!
[mv_create key="73" type="diy" title="DIY Distressed Faux Beams" thumbnail="https://www.ourfamilylifestyle.com/content/images/2026/01/kitchen-and-dining-room-after-diy-faux-beams-2.jpg"]